13 Biggest Fitness Myths That Have No Relation to Reality

Do you want to start a workout but relying on the myths? Know the top 13 fitness myths and debunk them with the real and proven facts given by experts.

If you are concerned lately for your health and thinking to start a workout, the fitness myths are what make you extremely bothered. These myths are like the age-old dictums, and these are obviously never proved. So, if you want to start workout just pat your back and go for it; Let the myths not kill your concern for fitness. If these myths are holding you back, you should know the real and proven facts right now, and we are here to assist you in knowing the reality. Take a look at the common myths and debunk them with reality.

Top 13 Fitness Myths to Stay Aware Of

Being aware of the fitness myths is important to avoid any misconceptions you currently have about workout. Remember, trusting these myths can also devastate your health and fitness! So, take a look at the most popular myths regarding fitness.

1. Pain is Important

It is the weirdest myth among all, and you have definitely heard that. It means the workout is all about pain. After a workout, you are having pain means that you have the most effective workout. Also, it means that the muscles are now growing. Due to this reason, many people want more exercise during pain.

This one is completely baseless because beginners sometimes do not get pain after a workout session, and it is all because of the high level of stamina in them. There is also a probability that your muscles are stronger, and you can tolerate the heavy exercise.  It is the reason why you are not having any pain. So, it is totally normal if you don’t have pain.

Remember that doing exercise during pain is not a smart idea, so don’t try to exercise during pain. If you are having pain regularly, you may need proper monitoring. You will need to skip the exercise and consult a doctor about that.

2. More Sweat Equals to More Weight Loss

Another myth about fitness is more sweating is a sign of weight loss. And if you are not sweating enough, your workout is not that effective. Moreover, the myth also tells that sweating indicates a fast weight loss. Following this myth, many people, during their workout, try different ways (like turning off the AC, running, and high speed in exercise) to sweat. Females are especially seen to be obsessed with this, and they often try the slim belts to sweat. It is believed that fat in the form of sweat is coming out of the body.

It is also not beyond question because sweating is completely a biological reaction, and sweat is a combination of salt and water excretes of the human body, not the fat. If you drink insufficient water, you will sweat less irrespective of how long you exercise. Many people do not sweat even in overheat conditions, and on the other hand, some others sweat excessively even in a moderate temperature. It is not at all related to fitness or fat burn. You will still lose weight without sweating.

3. Diet Does Not Matter until you are Exercising

According to this belief, you can consume anything, but that will not affect weight until you are not skipping the exercises. As you are going through the heavy exercise, you will be able to control your weight irrespective of what you eat. Also, it will be alright to consume oily and junk food as you have a walk 30 minutes on a treadmill or some other machines. In case you feel that you have eaten much, you can do a little more exercise for effective results during weight loss.

Several trainers crush this myth in multiple ways. Gym instructors have given their opinions that weight loss and living healthy depends on the combination of exercise and diet. They are extremely specific about it, and they mentioned it is approximately 30% exercise and 70% diet, which leads to a healthy and fit body. If you keep eating junk foods, your results will always be below the expectation level. It will not matter how much you exercised; your weight will not be reduced.

4. Target Fat Reduction is Alright

Another opinion regarding fitness is that before starting a workout, if you can decide how much fat reduction you need, you will get a better result. It is because your target will help you to decide which exercise you will need to do. It is believed that by doing this, a person stays more focused during the exercise.

However, the reality is that you and your friend will not have the same amount of fat in the same body parts. Until and unless you identify the fatty body part for weight reduction, there will be a chance of selecting the wrong exercises. So, targeting the specific weight to reduce will be of no use. Also, fat cutting from different body parts takes different times, so try not to target.

5. Workout Routines for Men and Women Have to Be Different

Another weirdest belief is that the workout routine of males and females has to be different. It’s like females are from some other planets, and even though a man and a woman have the same problem, their workout routine has to be different. Also, it is believed that a woman may look manly if she weightlifts or does bench press like men, she will tend to look manly. Therefore, the number of plates or the time of running, all has to be reduced for females.

It is sometimes true that most of the women start exercising to reduce fat, and men mainly want to gain muscles by doing the exercises. In this matter, their workout routine has to be different. But when they have a similar purpose, they can have similar workout routines. Sometimes females need to do more weightlifting than men to gain muscles. A gym instructor will schedule their workout according to their structures and requirements. It is a meaningless belief that building muscles will affect her appearance, so you don’t need to worry!

6. Crunch Is the Best Exercise for Core and Abs

If you want to shape up your cores and abs, you have to do crunches, and following this myth, especially the teenage females tried uncountable crunch, to get a figure to wear the crop tops, but they ultimately ended up in pain.

The fact is doing the same exercise with multiple repetitions is not a smart idea. It will lead to stress in one particular muscle. In case you want to shape your cores or abs, you do not have other options, and you have to try multiple exercises. If you target anyone, whether it is crunch or sit-up or anything else, it will be less effective. Even if you target six-pack abs or eight-pack abs, you have to rely on different exercises other than crunch.

7. Cardio is the Best for Weight Loss

Another misconception regarding fitness is that there is nothing better than cardio if you are looking for weight loss exercise. Also, it helps to reduce stress and to strengthen the immune system.

In reality, the combination of aerobics and cardio is a smarter way to be slim faster. If your goal is to get a toned body soon, you simply cannot rely on cardio only. Cardio is undoubtedly good exercise, and cardio has uncountable benefits too, but to cut fat from your body, you have to include variation here. According to the trainers, a person will get better results by combining cardio with other workouts like Zumba, aerobics, and jump rope.

8. Excessive Weightlifting Will Make You Bulky

If you tend to do much weight lift, you have definitely heard this one. Weightlifting can make a person bulky in the future. It’s because weights convert the fats into heavy muscles, and if you are unable to continue the exercises in the future, your muscles will disappear, and fat will come back in those body parts.

It is a false belief because, in reality, the weights will make you stronger. But if you fail to maintain a healthy lifestyle and a healthy diet, you will probably look bulky. It’s simple; you can’t expect your muscles to stay normal by consuming unhealthy foods and stopping the exercises.

9. Pre-Workout Stretches Are Mandatory

It is opined that the pre-exercise stretches are mandatory because it prepares the body for the rest of the exercise. Also, the stretches are said to remove stress from the body to prevent you from any injuries during the workout session.

But the fact is warm-up is more necessary to reduce the stress from the muscles. You can even run for that warm-up. Alternatively, you can do other free hand exercises for this purpose, which will be completely natural. You do not necessarily need to do the stretches before going into the main workout.

10. No Exercise in Empty Stomach

It is advised to exercise in an empty stomach for better results and to follow that many girls and boys opted for exercising in early morning to get more effective results.

It is definitely not a proven fact because there are several opposite examples. There are multiple proofs that after exercising on an empty stomach, you may feel dizzy, and you may have blackouts too. Actually, your body needs the strength to continue such a heavy workout. In fact, you need to eat at least something, even though you are not doing pull-ups or bench-press because the food will provide energy for your workout session. So before having any workout, it does not matter how light it is, you have to eat something.

11. You Can Eat Only the Egg Whites, but Egg-Yolks Will Make You Fat

Egg yolks contain excessive fat and other harmful elements, and therefore, it is not healthy if you want to be healthy. But egg whites are healthy enough, and it will be alright to include this even though you are on a diet.

This myth is debunked by a lot of people saying that boiled egg is always alright, and you can consume egg yolk too. But frying the eggs in butter or oil will be extremely unhealthy for anyone.

12. You Can Have Better Results in Machines than the Free Weights

Machines will serve you better as you can adjust the weight there. Also, you will have the least injuries as you will be able to increase or decrease the speed or weight as per your capacity. On the other hand, free weights will make you sick.

Free weights, in reality, can make your muscles stronger, which will result in better shape of your body.  At the time of doing your daily works, you will be able to understand the differences. Actually, you need to use the combination of machines and free weights during the workout session, which will allow you to have visible results.

13. Exercising till Evening Will Affect Your Sleep

According to this myth, exercising in the evening is mentioned as harmful. It is because you will not be able to sleep at night if you keep exercise till late in the evening. As a result, you will be weak. Following this myth, people try to exercise during the morning.

It is a fact that morning exercises are good, but you will still get several people exercising in the evening and getting adequate sleep too. The reason behind this is the exercises reduce your stress, which helps them to have a better sleep at night. So do not worry if you are not a morning person. You will get effective results by working out at night.

These are the common myths regarding workout, which the trainers have marked as baseless. If you are still in a dilemma, you can contact the multigyms near you and get assured by the trainers that these sayings are far from reality. So, if you want a healthy lifestyle, you will need workout – there is no second opinion regarding this. Now you know the reality, so we can assume that the myths will not hold you back from starting a workout. Just prepare yourself for a better lifestyle with start workout to stay fit.

Try These Simple Yoga Workouts to Sleep Better – Beat Insomnia Today

Not having enough sleep? Yoga can help! Just spend 15 minutes before going to bed with 8 simple and painless Yoga workouts and get better sleep.

Good sleep is what we all crave for, and failing to get good sleep is probably a common problem amongst all of us. As soon we face difficulties to fall asleep fast, we start scrolling our newsfeeds or exploring Netflix that worsen the problem. That’s pretty relatable, right?

Right now, 7 out of 10 people have this problem, and their casual approach is the reason behind the deterioration of their health. Lack of sleep at night makes them look dull and tired throughout the day. And how can we forget the unnecessary mood swings and anxiety? All these are the natural outcome of lack of sleep – specifically insomnia.

So, if you are dealing with insomnia, you should stop treating it casually. It’s high time to show your concern before it is too late. On a serious note, you can try Yoga – it can actually help you to sleep to have a healthy life.

What is Insomnia?

Good sleep is a result of a healthy lifestyle. So, it is pretty obvious that our lifestyle mistakes are greatly responsible for insomnia, especially among teenagers and adults. However, there can be medical issues like asthma, migraine, sinus, and lots of others, but our daily habits, stress, work pressure, and of course addiction to mobile often lead to insomnia too.

Apart from health issues, two types of insomniacs are found: The first type used to sleep late to study or to do some urgent work previously, and now they can’t sleep before that time. These people do not get sufficient sleep because of the hurry of waking up on a specific time.

The second type starts thinking as soon they go to their beds, and during this, they start watching a movie or scrolling on social media. When they are done with that, sleep is almost gone.

How Can You Get Better Sleep?

It really does not matter which type of insomniac you are as the lack of sleep is common in both. So disappointing and hopeless! But before you lose all your hopes and before you start depending on the un-prescribed sleeping pills, you can try Yoga at least once.

Yes, Yoga! It is probably the most neglected exercise because of the myth that it takes too much time, but the reality is it can give you permanent relief from insomnia.

8 Best Yoga Workouts for Better Sleep

You will need to spend only 15 minutes every day and that too before going to bed. Neither you will need to go to the gym, nor will you need any equipment for performing these yoga workouts.

Are you worried about pain? Well, these exercises will not be the painful ones; rather, your muscles will feel relaxed. A 15-minute Yoga session will reduce the stress level, which will lead to better sleep.

If you are still in doubt with the benefits of Yoga, you can check this survey results, which confirm that Yoga can reduce stress and give comfortable sleep. So, gear up and start doing 15 minutes of bedtime Yoga. Have a look at the details:

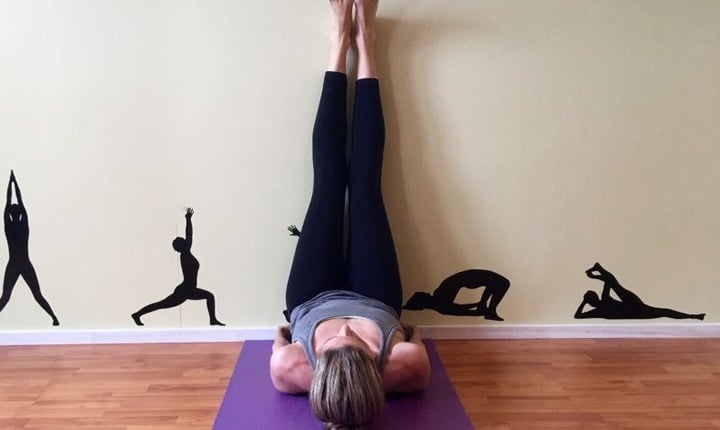
1. Legs up the Wall Pose

Legs up the Wall Pose

For this, you will need to lie on your back and first lift your right leg and then the left one. Let your legs relax on the wall. Stretch your feet towards the wall and bring it back to its original position. Now, extend your arms on the sides and keep your palms up. Close your eyes (you can use eye cushion), take a long breath and exhale slowly. Hold this position for 2 minutes.

You will feel the comfort right then if you have to stand for a long time. Your legs will be stress-free, and Lactic acid from your legs will be drained after doing this. Also, your lower back will get much comfort. You can take a blanket below the lower back and a pillow below your head to do this Yoga in a better way.

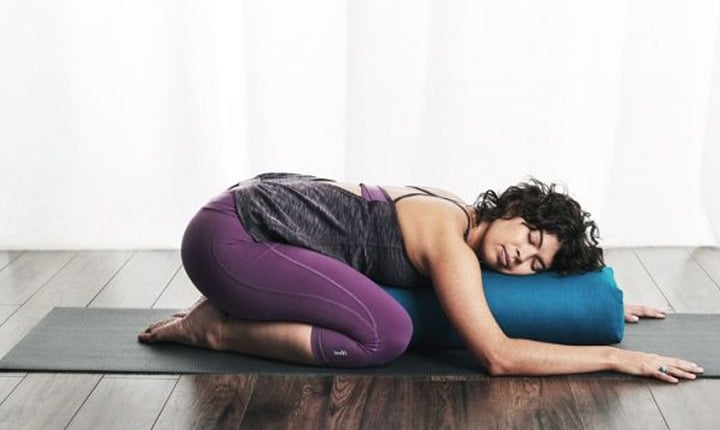
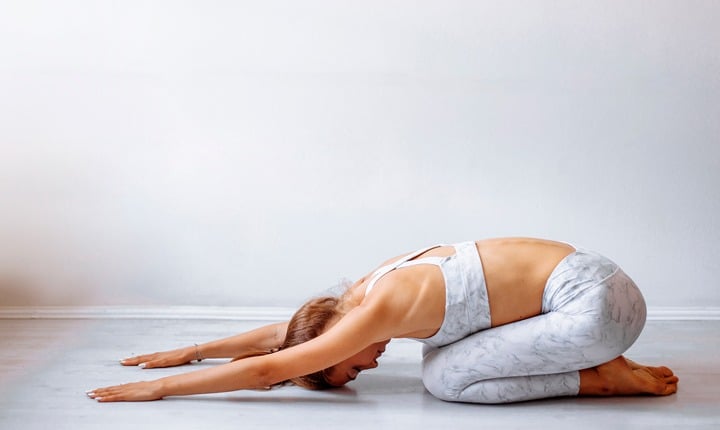
2. Child’s Pose

Child's Pose

It is another pose which can make you feel very comfortable and relaxed. For this pose, you will need to kneel on the floor. Keep your toes together at the time of kneeling. Now, slowly try to separate your knees as wide you can but do not pressurize to widen your knees.

Now, exhale and bend your upper body towards the floor and ensure that your belly touches the thighs. Rest your arms on the front side. Keep your shoulders relaxed and try to touch the ground with your forehead. It will take a few days to do it properly, but you do not need to pressurize. Try to hold this pose for a couple of minutes. If you are uncomfortable, you can try 30-45 seconds.

Once you can touch the floor with your forehead, try to swing your hands the back, keeping palms up.

Avoid this if you have injuries in the hip or knees. You can roll your head from left to right and then reverse to feel the comfort.

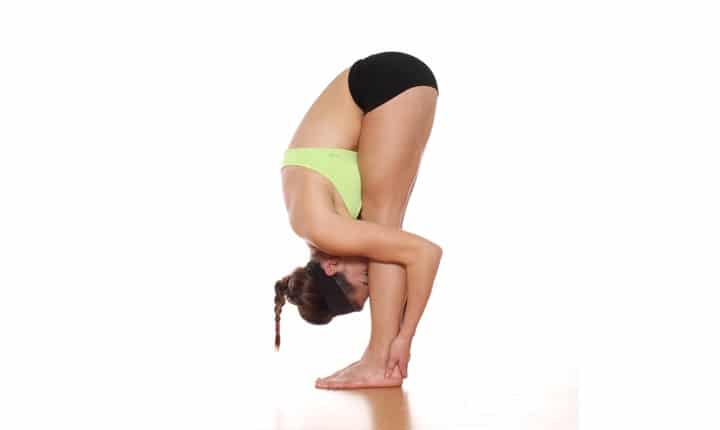
3. Standing Forward Bend

Standing Forward Bend Pose

Extend your feet to hip’s length or a bit wider.  Now bend your knees slightly and twist the upper body across your legs. Try to touch the floor (don’t pressurize) with hands. Hold this for 2 minutes. Inhale and exhale slowly while doing this.

Don’t worry if you are unable to touch your legs with the torso. It will take time, so you will not need to force your upper by stretching it towards the legs. Always try to bend as much you can do comfortably.

It will stretch your back muscles, and reduce the stress from your spine. As a result, the blood supply gets improved. Your neck and shoulders will be relaxed too. You will see the pressure to get released from your knees, hamstrings, and thighs. If you have a back injury, you can skip this.

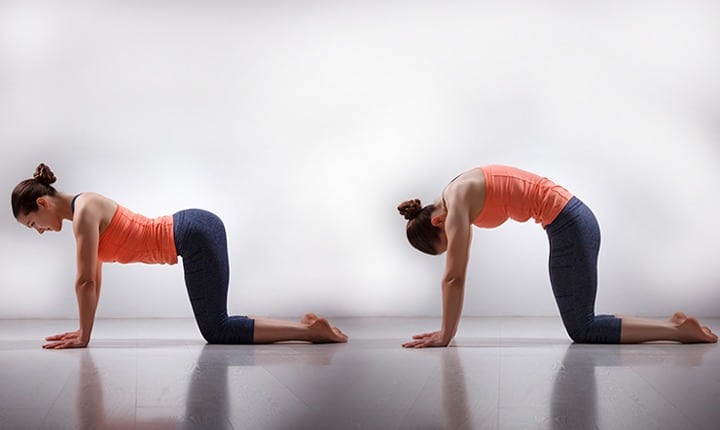
4. Cat Stretch

Cat Stretch or Cat-Cow-Pose

Right after doing Standing Forward Bend, take a break of 30 seconds and then move on to Cat Stretch. It is also called cat and cow pose. For cat pose, kneel on the ground and extend your feet on the floor. Now bend your upper body and touch the floor with your arms extending them to your shoulder length. Pull your shoulder blade apart and try to create an arch from your head to the tailbone. Exhale while doing this, and at the time of inhaling, you have to do the cow pose. For cow pose, try to do a reverse arch from your head to the hips keeping arms and legs at the same position and continue this for 2 minutes.

In order to skip your spine flexible and strong, this exercise works very well. It can improve your blood circulation. Also, it helps in your digestion so that no digestion issue occurs at the time of sleeping.

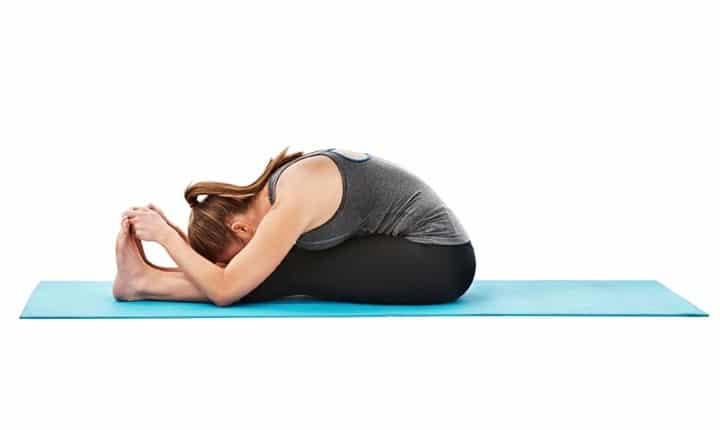
5. Seated Forward Fold

Seated Forward Fold Pose

Sit on your hips; you can use a pillow or blanket if you have low back or hamstring problems. Now you will need to extend your legs in front of you. Stretch in and out your feet a few times, but keep your spine firm at the time of doing this.

Now raise your hand and breathe in. Now, slowly bend your upper body and try to touch your toes with hands. Exhale as you reach the toes but slowly. Make sure your arms are spread over your thighs, knees, shins, and toes.

Well, it is a bit difficult exercise, and you don’t need to force your hand to reach your toes on the first day. Keep it in mind that the target is to reduce pain and stress from your back and hips not to reduce fat from the lower abdomen. So, you don’t need to hurry.

On the first day, try to hold this pose for 10 seconds (not more than that) and gradually, increase this time to 1 minute. On the initial days, you may have some difficulties; you may use a pillow above the thighs at that time.

It helps to stretch your legs to reduce stress from them. Also, it will help your back to relax. As stress from the back will be gone, you will be able to acquire better sleep by choosing a comfortable sleeping position.

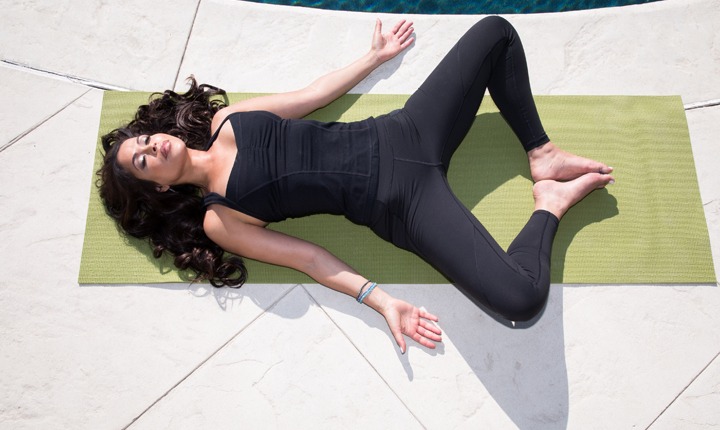
6. Reclining Bound Angle Pose

Reclining Bound Angle Pose

For this one, you will need to lie down and bend your knees, keeping your feet on the ground. Try to bring your feet close towards your tailbone. Now, put the soles together and extend your knees apart. Keep your arms relaxed on the sides keeping palms towards the ceiling. Try to touch the ground with the knees but without any pressure. It may take 10-15 days for that. Inhale and exhale at a slow pace and hold this pose for 2 minutes.

You will be able to feel the stretch once you can do it properly. In order to reduce tension from groin and hip areas, this exercise is an unbeatable one. Your thighs and joints will be free from the stress with this exercise. Also, your shoulders will feel calm and relaxed.

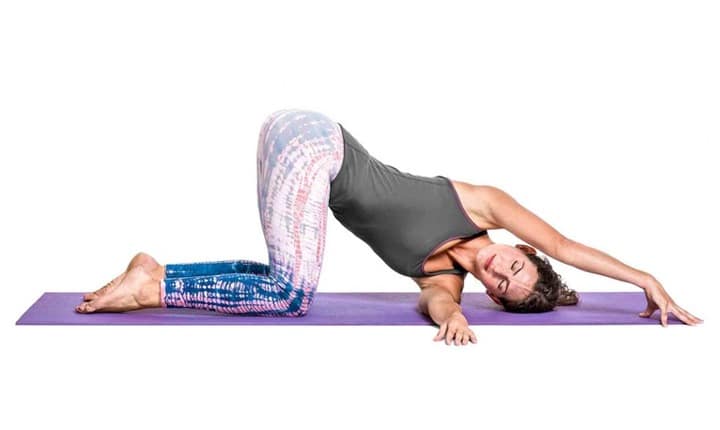
7. Thread the Needle Pose

Thread the Needle Pose

Start with kneeling, and you are free to use a blanket if you want. Lift your back and stretch your left arm on the right side, and your right arm will touch the ground above your head. Look towards the left hand and breathe in. Hold this for 10 seconds and breathe out slowly while bringing the left arm on the left side and the right one on the right side. Now, try on the other side. Do the cycle five times initially and increase it to 10 counts later.

It will help to stretch your upper portion of the back and reduce stress from your shoulders and neck. It will loosen the hamstring stress as well, which will allow you to have a comfortable sleep. If you have problems at the time of standing after sitting for a long time, it will be reduced by doing this.

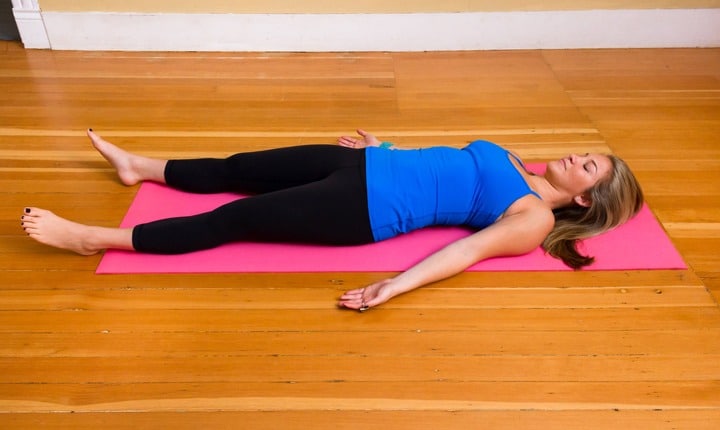
8. Corpse Pose

Corpse Pose

End this session with this one to have a complete cycle. All sorts of Yoga exercises generally end with this one. Here you will allow your breathe-pace to come back to normal. You can do it on your bed as well. Keep your body relaxed and lie down comfortably. Rest your arms and shoulders. Keep your feet apart in a comfortable position and rest your back.

The goal of this exercise is to remove all the stiffness from your body and muscles.

If you are having trouble to sleep, these eight yoga poses will surely help you by reducing your stress to have a stress-free sleep. For more bedtime exercises to cure insomnia, feel free to consult the best gym in Kolkata. If you are dealing with insomnia for a long time, it will take time, but the results of Yoga will shock you. You will gradually love doing this for sure. Also remember that doing bedtime Yoga along with a healthy diet, a few morning exercises like running or swimming will be much appreciated to beat insomnia. Well, consulting a doctor for insomnia is never a bad idea, and if you think your doctor will prescribe sleeping pills, you are wrong. If you are having serious problems, do consult a doctor but keep doing Yoga for more effective results.

8 Powerful Yoga Workouts for Getting Toned Abs

Yoga workouts help in toning down your core and improving the posture of your body. Practice these Yoga Workouts for Toned Abs.

Nowadays, fitness enthusiasts primarily focus on getting toned abs and cutting down the stubborn belly fat. People often have seen to find out the best multigyms in Kolkata and put much effort to get toned abs because belly fat is not easy to cut down.

If you want to improve your posture and get toned abs in a natural process, then no other exercise can give you a better result like yoga. Practicing yoga workouts will not only reduce the fat of your belly, but it will save you from various diseases that are caused due to obesity.

A flat tummy not only makes you attractive, but it also helps you maintain the coordination and balance of your lower body.

Yoga Asanas for Flat Abs and Strong Core

You don’t need to spend an entire day in a gym. Adopt the power of yoga workout from an expert trainer because the regular practice of asanas will help you reach your fitness target naturally without experiencing any injury. Have a look at some of the most effective Yoga workouts for flat and toned abs:

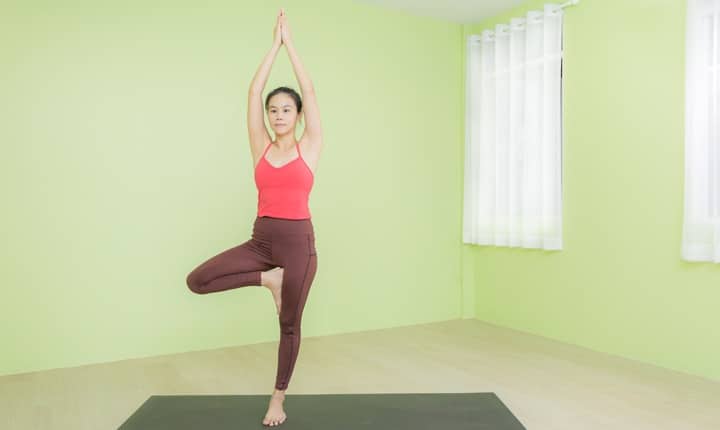
1. Vrikshasana (Tree Pose)

Vrikshasana (Tree Pose)

This exercise helps in toning the abdominal muscles and strengthening the core. Vrikshasana helps in improving your posture and balancing your body. According to the fitness experts, Tree Pose increases your concentration power. People of every age can practice this yoga easily.

Steps:

  • Stand straight with 2-inches feet apart.
  • Focus on a point by looking straight in front.
  • Start inhaling and extend your arms up to join the palms.
  • Hold your left leg to the right leg like a Flamingo.
  • Continue deep breathing in that position by tucking your tummy.
  • Expand your spine upwards with every exhalation.
  • Repeat the same steps on the opposite side.

Caution: If you have insomnia or low blood pressure, then avoid practicing this asana.

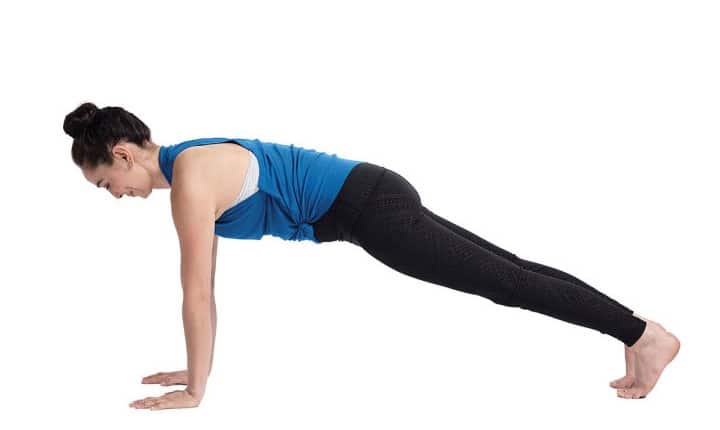
2. Kumbhakasana (Plank Pose)

Kumbhakasana

This asana is one of the dynamic poses to cut the fat of your abs. If you stay long in this position, then this activity can be beneficial for you. Moreover, this asana helps in strengthening your thighs, hamstrings, and forearms. After pregnancy, women are suggested to practice this yoga for toning up the loose muscles of their belly. This yoga also helps in toning the muscles of your hands and defining the shape of your collar bones.

Steps:

  • Keep your hands and knees by assessing them in a tabletop position.
  • Your wrists should be beneath your shoulders, parallel to the top of the mat.
  • Now spread your fingers wide and distribute the weight throughout your hands.
  • Start lifting your chest higher and make it broad across your chest and collar bones.
  • Now look down by keeping your neck in a straight line with the spine.
  • Engage your thighs and core to prevent sagging in the back.
  • Lastly, lengthen your tailbone towards your heels.

Caution: If you have knee pain, shoulder pain, and high blood pressure, then take the suggestion of a physician before practicing this yoga.

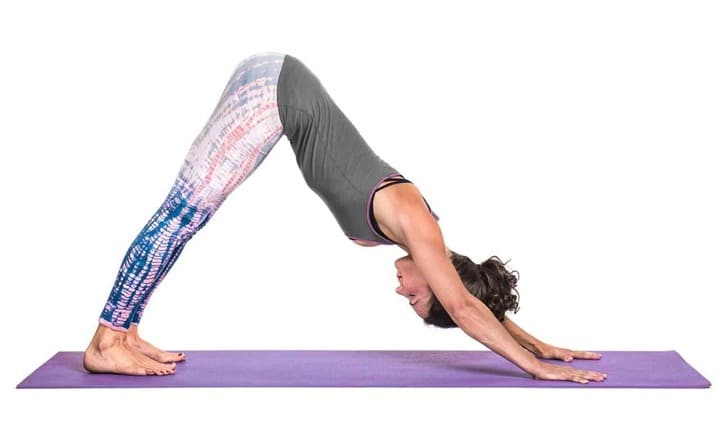
3. Adho Mukha Svanasana (Downward Dog Pose)

Adho Mukha Svanasana

Practicing Downward Dog Pose will not only help you in toning your abdominal muscles, but it will also shape up your waist. This asana helps in boosting the strength of your core muscles and strengthening your forearms. This asana also removes the stiffness of your shoulder and reduces the pain of spondylosis.

Steps:

  • Kneel on the floor and keep the distance between your two legs.
  • Keep hip-width distance.
  • Now press your hands on the ground.
  • Straighten your knees, elbow, and heels by touching the floor.
  • Lift up your head and bend the knees.
  • Now gently sit on the floor.
  • Inhale and exhale slowly while practicing this asana.
  • Repeat the steps of this asana three times.

Caution: Don’t attempt this yoga if you have high blood pressure or shoulder discomfort. Moreover, if you are pregnant, then consult the doctor before adding this asana in your fitness routine.

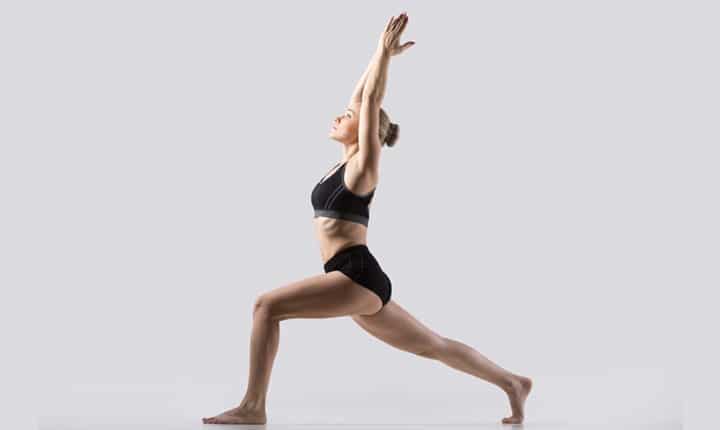
4. Virabhadrasana 1 (Warrior Pose 1)

Virabhadrasana

If you are finding a powerful way to tone and strengthen your abs then Virabhadrasana is the best choice for you. This asana will also help in toning the muscles of your shoulder and thigh. This is a part of a stretching exercise that slowly pulls your core muscles.

Steps:

  • Breathe in and breathe out deeply.
  • Keep your legs wide 4-5 feet apart.
  • Now, raise your arms upwards and join both the palms over your head.
  • Keep the right foot outwards 90 degrees to the right side.
  • Now keep the left foot inwards 45-60 degrees to the right.
  • The right heel should align with the arch of the left heel.
  • Rotate your torso to your right side and keep your arms straight.
  • Bend your right knee until your thigh becomes parallel to the floor.
  • Form a 90-degree angle alignment between your right shin and right thigh,
  • Remember, the bent knee should not extend beyond your ankle.
  • Now look at the upward direction and join your palms.
  • Retain this final position as much as you can hold.
  • Now, reverse the movement to another side.
  • Repeat the steps of the asana twice to get a better result.

Caution: If you have diarrhea, then avoid this asana because this pose may create pressure on your abdomen. Moreover, arthritis patients are suggested not to practice this exercise.

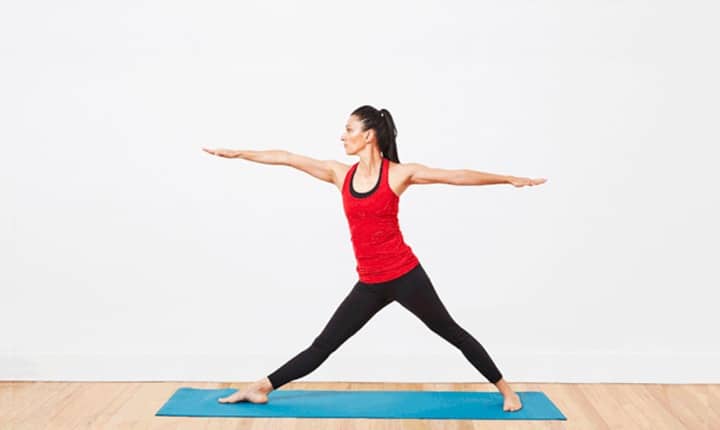
5. Virabhadrasana 2 (Warrior Pose 2)

Virabhadrasana 2

This asana stimulates in toning your abdominal muscles by engaging your lower body part. If you practice Warrior Pose 2 regularly, then it will tone down your thighs also. This yoga is good for the health of pregnant women. Moreover, it relieves the stiffness of your shoulder, back, and neck. Health experts suggest practicing this exercise to reduce the problem of sciatica. This yoga also aids proper digestion.

Steps:

  • Keep your arms in line with your shoulder, parallel to the floor.
  • Stretch the arms as much as possible.
  • Look straight to your right side by keeping your head right.
  • Keep your torso straight and in an erect way.

Caution: If you have arthritis, then take the help of a certified fitness trainer for practicing this yoga. People who are suffering from cardiac issues and high blood pressure should avoid practicing this yoga.

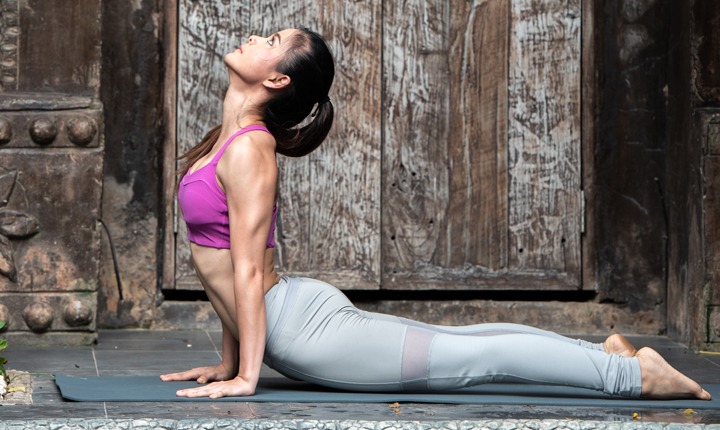
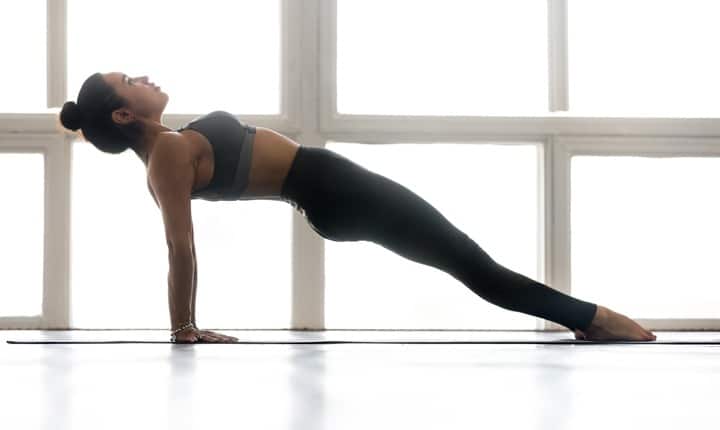
6. Purvottanasana (Upward Plank Pose)

Purvottanasana

Along with your abs, your waist and an upper back portion will also be toned if you practice this yoga. This asana helps in strengthening the muscles of your arms, glutes, wrists, core, legs, and back. This yoga also acts in reducing fatigue and depression to relax your mind.

Steps:

  • Stand in Dandasana or staff pose.
  • Keep both your hands behind your hips, and your fingertips should face the feet.
  • Bend your knees and keep your feet on the floor, and your feet should be hip-width apart.
  • Now push your feet and hands strongly on the ground and breathe out. Keep your arms straight.
  • Straighten your spinal muscles by pointing the toes in an outward direction.
  • Raise your hips as much as possible, and hold it as much as you can hold.
  • Repeat this process around 3-5 times.

Caution: If you have pains and injuries on your wrist, then this asana should be avoided.

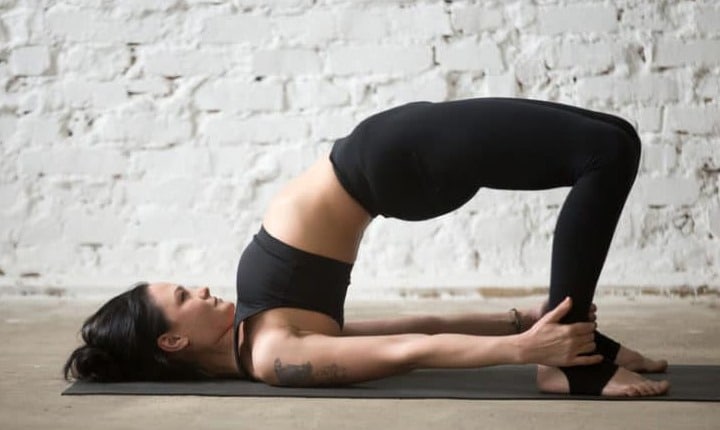
7. Setu Bandhasana (Bridge Pose)

Setu Bandhasana

This yoga is like crunch exercise It keeps the muscles of your core tight and lifts up your lower body. It is one of the easy asanas, so people of any age can practice this yoga. It also provides a toned waist.

Steps:

  • Lie down on your back at first.
  • Fold or bend your knees and keep your hip with your feet distance apart on the floor.
  • Now take your arms just beside your body, and your palms should face down.
  • The distance should be about 10-12-inches from your pelvis.
  • Keep your knees and ankles in a straight line.
  • Hold the position as much as you can do.
  • Now return back to your normal position.

Caution: If you are pregnant, then ask a health practitioner while practicing this asana. Moreover, if you are having back and neck injuries, then you cannot practice this asana. Always try practicing safe exercises during pregnancy to avoid problem.

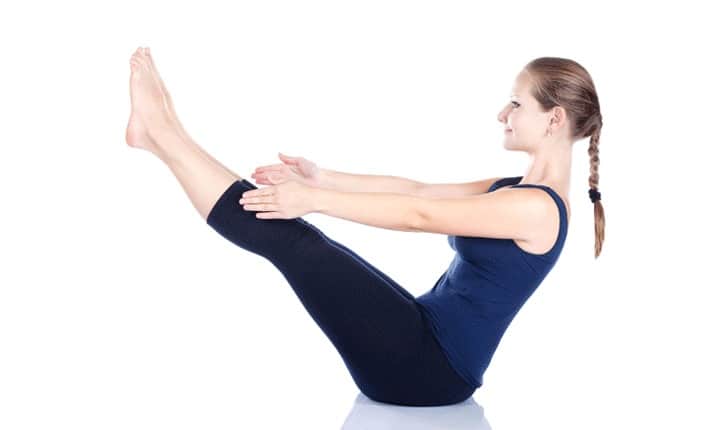
8. Naukasana (Boat Pose)

Naukasana

This yoga workout provides you toned abs and also improves your stamina. Naukasana helps balance your back and the entire body. The main focus of this workout is on your belly and the bottom part of your body. This yoga strengthens the muscles of your arms, shoulders, and thighs. Moreover, it improves the functions of your liver, kidneys, and pancreas. Practicing this workout regularly will regulate the sugar level in your blood.

Steps:

  • Lie down flat on the floor, and keep your arms and feet together on your sides.
  • Now keep your fingers and arms straight outstretched towards your toes.
  • Lift your chest and feet from the ground by stretching your arms towards your feet. You will feel the tension in your stomach area while practicing this asana.
  • Let the weight of your entire body rest on your buttocks, and make sure that your toes and fingers are in one line.
  • Hold the breath in this position for a few seconds.
  • Inhale and exhale slowly while practicing this yoga.
  • You can do 3-4 repetitions while doing this asana.

Caution: The patient of arthritis should take the help of a yoga trainer for practicing this asana.

Regular practice of the aforesaid asanas improves the balance of your body and helps you reduce the strain of your spine and torso. These asanas are safe to practice and you will naturally start gaining the results in six months if your practice these yoga workouts continuously. Along with fat cutting formulae, yoga is also strength training workout that helps in building stamina.

Best Exercises to Improve Your Body Balance

Take a look at the best exercises to improve the balance of your body. Each of these workouts will help you maintain a better balance. Let’s explore!

It is always necessary to balance every aspect of your life, whether it is your body or lifestyle. Health becomes the prime factor when you try to balance your life. Now, if we are talking about balancing, then why don’t we start improving the balance of our body by practicing some smart workouts?

Some exercises to improve balance helps in increasing your strength, coordination, and flexibility of your body. The benefits of balance training are experienced by people of every age, but different workouts are designed for different age groups. Also, balance exercises help in performing daily tasks easily.

Not only a single body part, but the other organs like muscles of legs, hands, lower back, and lower body are also strengthened and balanced by practicing balance exercises. So, elderly people, children, and young adults are suggested to visit any multigym near you and start practicing body-balancing exercises with the help of the certified trainers.

Workouts to Improve Body Balance for Different Ages & Groups

According to the proficient fitness trainers of best gyms, balance exercises are designed as per the age and body capacity. There is a huge difference between the body of a child and an adult because beginners cannot practice the workouts of intermediate level people. So, you can have a look at different exercises for different ages to start the workouts properly with some fitness training tips on workouts.

Balance Exercises for Kids

Balance exercise is necessary to be practiced from childhood because it develops the strength of the bones and muscles of the kids from a very early age. Moreover, if children learn how to maintain the balance of their body, then they will be cautious about their diet, weight, and height from childhood. Practicing these exercises will help to get a fit and flexible body for children. Balance training also improves the posture of the children. These exercises help maintain the balance of the body of your kids with fun.

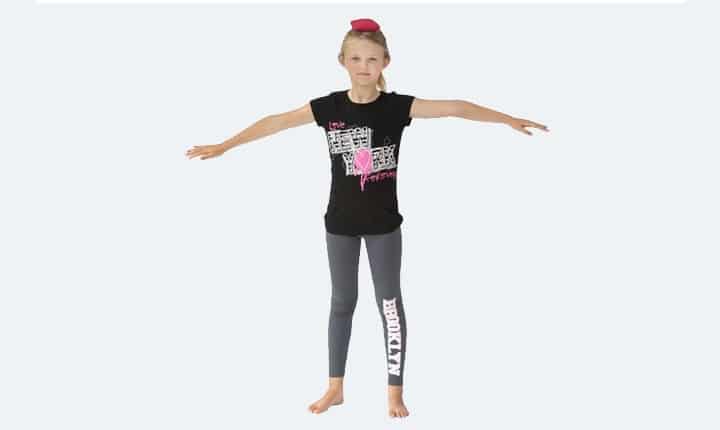
Bean Bag Balance

Bean Bag Balance

Bean Bag Balance helps you balance the lower body of children. It also maintains the flexibility of the body if the kids are training themselves for sports, athletics or any race.

  • Keep a bean bag on the top of your shoulder or head.
  • Try to walk in a straight line to maintain the balance of your posture.
  • Now, try walking in a zig-zag way by moving side to side or move backward.

Note: You can practice this exercise by keeping a book on the top of your head.

Musical Statue

Musical Statue

This exercise is more like a game than a physical activity. This will not only balance the equilibrium of the body, but it’s also an interesting way to practice exercise for children.

  • Play music and tell your children to move and dance.
  • Once you stop the music, they have to stop like a statue.
  • Again, after playing music, they have to start the same movement.

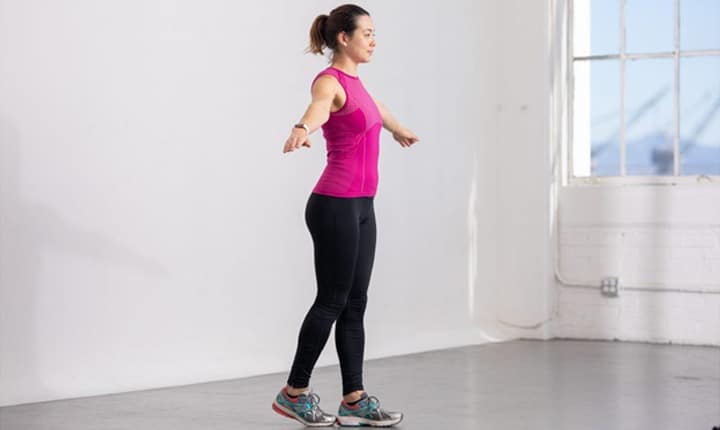
Heel-Toe Walking

Heel-Toe Walking

If you want to bring flexibility in your hands and legs, then Heel-Toe Walking is a good exercise for you. It will also strengthen your joints and bones of the toes.

  • Bring both your arms at your side, and parallel to the floor.
  • Use a string or chalk to mark a line and follow it.
  • Walk straight on the line by placing your back of the heel against the toes of another foot.
  • Now, start moving slowly but with control.
  • You can continue this for 10-20 steps.

Balance Exercises for Adults and Elderly People

Fitness coaches recommend some exercise to the adults that will improve their balance, keep their body active, prevent them from injuries and maintain the coordination. If you practice these balance exercises regularly, then you will become active to do physical activities and other regular works.

Gym trainers also suggest practicing balance exercises to the elderly people to bring balance in their body, walk properly and reduce severe diseases. These workouts will also define your posture. Take a look at a few exercises to improve your balance.

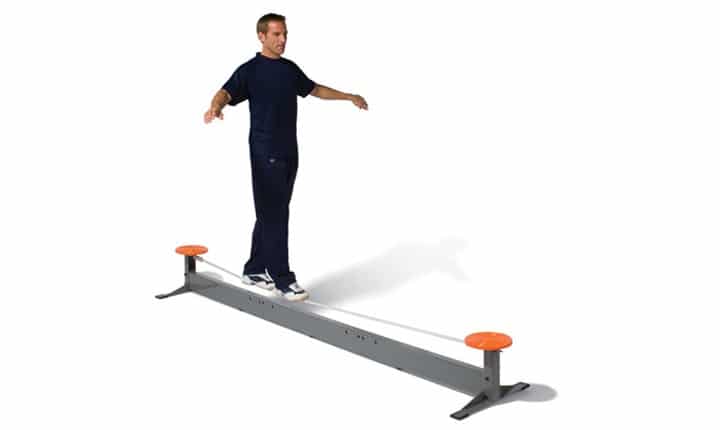
Tightrope Walk

Tight Rope Walk

For boosting core balance, strength and for defining posture of adults and elderly people. Moreover, this exercise also reduces the joint pain of elderly people. But remember this exercise should be done under supervision of a fitness trainer because wrong step may harm you. This exercise is also a kind of strength training workout.

  • Keep a rope or a string on the floor.
  • Now, hold your arms out wide to both sides.
  • Don’t step to the side, and walk on the string or the rope to maintain your balance.
  • Your feet should not go out from the rope.
  • Walk for 10-15 steps following the instruction.

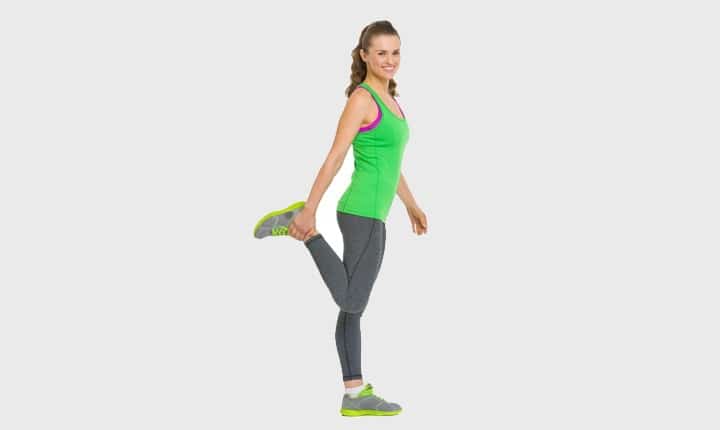
Flamingo Stand

Flamingo Stand

This is a senior-friendly stretching exercise that will help you practice stretching. Moreover, this balance exercise will also help in muscle movement of your legs. You can also strengthen your toe and knee joint by practicing this exercise. This workout also helps in reducing the belly fat.

  • Stand straight and lift up your right leg.
  • You can use a wall or a chair for support when you are stretching your right leg forward.
  • Keep your neck, head, and spine in one line to maintain your posture.
  • Extend your hand, so that your right foot can reach it.
  • Hold each step up to 15 seconds, and repeat on the opposite side.

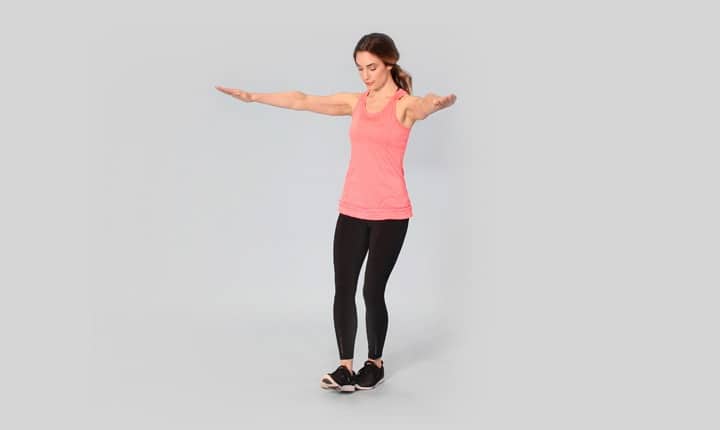
Rock the Boat

Rock the Boat

Seniors who are the daily walkers can practice this exercise instead of walking sometimes. While practicing this exercise, avoid straining your muscles excessively. This balance exercise will help in strengthening your legs, knee joints and foot. Moreover, the leg movement helps in increasing flexibility.

  • Stand straight with your feet and keep the hips wide apart.
  • Press weight to both the legs firmly.
  • Lift up your right foot and yield your weight on your left foot.
  • Try to hold up this position for 30 seconds.
  • Now, gradually lower your left foot to the floor.
  • Repeat the same steps to the other side.
  • Do the steps for 5-10 times.

Balance Exercises for Sportsmen or Athletes

Athletes and other sportsmen need rigidity, flexibility, and balance in their body, so that they can start playing a game to win. Try to make yourself that much strong, so that you don’t get week in the playground. You may have a look at some exercises to improve the balance of the athletes.

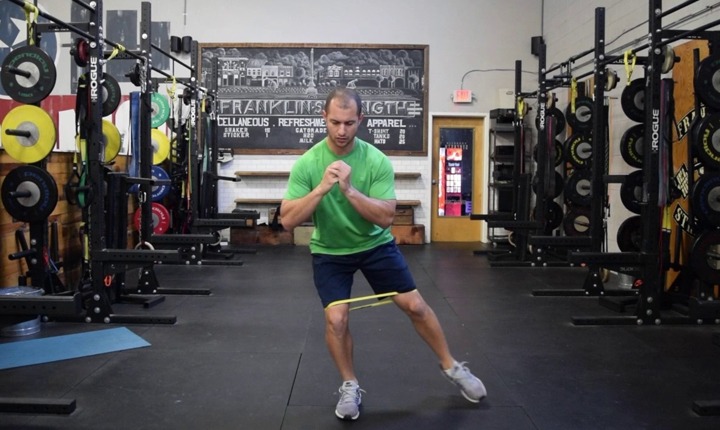
Banded Triplanar Toe Taps

Banded Triplanar Toe Taps

This exercise helps in strengthening the muscles of your legs, and glutes. Moreover, this exercise will also help the athletes run in a race or win a game easily. This workout can make your movements faster.

  • Tie a resistance band around the lower part of your thighs above your knees.
  • At first, start single-leg squat and quarter leg-squat on your right leg.
  • Engage your hip and core muscles.
  • Now you the resistance of the band, and tap your left leg forward to your side.
  • Do the same step from the straight behind you.
  • Practice about 10-20 repetitions.
  • Do the same steps to the opposite leg.

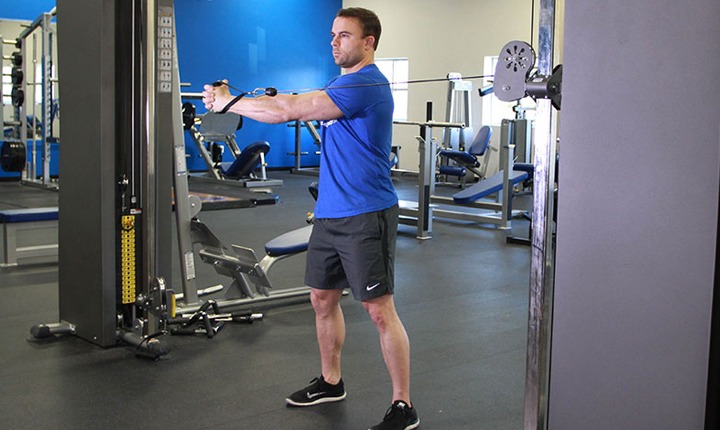
Paloff Press with Rotation

Paloff Press with Rotation

This is a full-body exercise that mainly works on your arms, upper body and waist. This workout will not only balance your body, but it will also cut the extra fat from your arms and upper portion.

  • Stand straight by pressing a cable machine.
  • Now hold the handles of the cable by using both your hands at the height of your chest.
  • Extend your arms away from your body by walking to the right side.
  • After turning away from the machine, engage your core to maintain the alignment through the central line of your body.
  • Now extend your arms, then return to the starting position.
  • Repeat the same steps to the opposite side.
  • Practice 1-3 sets about 10-15 times.

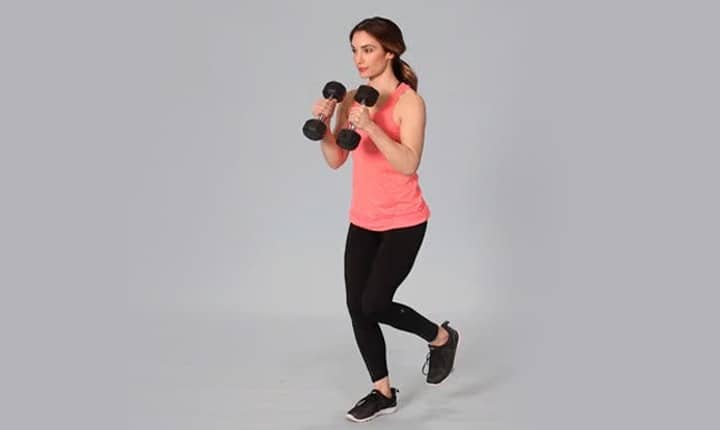
Single-Leg Cross-Body Punches

Single-Leg Cross-Body Punches

This exercise is for boxers, athletes and other sportsmen. This exercise can be practiced before a running competition, boxing game or any other sports. This exercise will improve the balance of your leg and bottom portion of your body. Moreover, it will strengthen your arms.

  • Hold two dumbbells in both your hands towards your chest.
  • Yield the weight of your body on your left foot, coming to a quarter-squat.
  • Now keep your left foot strong and punch the weight with the help of the dumbbells across your body at one time.
  • Do the same steps on the opposite side.
  • Practice 1-3 sets of 10-20 repetitions.

The exercises to improve the balance of the body also increase stability and confidence of your mind. You can practice balance workouts if you don’t have any equipment. Right effort and your will power can help you in increasing the static and dynamic balance of your mind and body. The above-mentioned exercises are for the people of every age as discussed. You just need proper training from a fitness coach who can guide you the correct steps of the balance exercises. Along with body-balancing, these exercises will balance your weight and Body Mass Index.

Best Hip-Strengthening Exercises That You Need to Master Today

Having hip-strengthening exercises in your workout regime would help you tackle all those terrible hip pains. Come, let’s master them.

Our hips are among the most underrated muscles in our body that are often not given priority while setting a workout regime. It is only when it starts bothering us, we start thinking about it, and sometimes we are too late to cover up the damage. Therefore, the importance of hip-strengthening exercises can’t be stressed enough. They are, in fact, a must for those who spend a considerable portion of their time sitting in front of a computer.

Today, let us take a look at some of the most beneficial hip-strengthening exercises that will have a long-lasting impact on the mobility and health of your hips.

Hip-Strengthening Exercises – Target Zone

Hip-strengthening exercises are designed to target two areas on your body – the gluteus maximus, which refers to the primary extensor muscle of your hip; and the gluteus medius, which is the primary muscle on the side of your hip.

To put it simply, you will be working towards strengthening and stretching the sides and back of your hips. In fact, these exercises also function as great fat-burning regimes that help you get in your favorite piece of clothing which you might have missed out on because of those extra chunks on your hips.

These exercises will not only help you look better but will also assist you in moving better. Although most functional exercises strengthen and stretch the muscles of your hip to some degree, a focused plan of a hip workout will undeniably hit the core areas.

Warm-Up Regimes for Hip-Strengthening Exercises

Hip-strengthening exercises can be tedious. As such, if you speak to any fitness expert at a multi-gym near you, they will advise you to start with some basic warm-up regimes that will prepare you for the upcoming exercises.  The warm-up regimes for hip-strengthening exercises are as follows:

Double Banded Pull Through

Double Banded Pull Through

To do this, you would need to attach a long resistance cable or band low to the floor behind you. Keep the band above your knees and stand in front of it with your feet shoulder-width apart from each other. Next, hinge yourself forward at the hips and push your butt by bending your knees to grab the band between your feet.

Doing so, you will immediately feel a stretch in your glutes and hamstrings. After this, lift up your chest and stand back up, by pushing your hips forward and squeezing your butt. Continue these entire process 12-15 reps.

Banded Hip March

Banded Hip March

Get your legs hip-width apart and stand upright by engaging your core and lifting your chest, all the while keeping a mini resistance band around both your legs. Put your right knee in front of you and bring it up to the height of your hip.

Make sure your pelvis is on an even level and the leg that you are standing on is inclined to the adjacent ankle, hip, and knee. Finally, finish it up by slowly and steadily putting your leg down. Repeat the entire process 5-8 times, altering between both the legs.

7 Exercises to Boost Your Hip Strength

With the warm-up done, your body is now ready for the hip-strengthening exercises. Although there are dozens of exercises that can take care of the said area, we are enlisting seven of the most beneficial ones among them.

Lateral Lunge

Lateral Lunge

Hold a dumbbell in each of your hands and stand with your legs together. Proceed to take a large step of about 2 ft out towards your right-hand side. When you hit the floor, hinge forward at your hips by bending your right knee to a lunge and pushing your butt back.

You need to ensure that the weights frame your right knee and that your left foot should be perfectly straight. Wait for a second, and push off your right foot back to the starting position. Repeat the process on your other leg. Continue this for 10-12 reps switching between each leg.

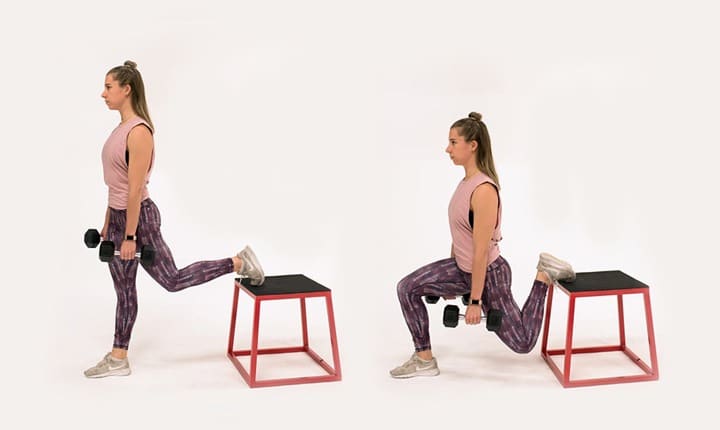
Bulgarian Split-Squat

Bulgarian Split-Squad

To do this, you need to stand with your back to an elevated surface, such as a bench. Keep your left leg on the ground a few feet in front of the bench and put the topmost portion of your right leg on the bench. Hold a dumbbell in each hand.

Next, bend your knees into a split-squad and brace your core. Make sure that your left knee is at a 90° angle to make your thigh parallel to the floor while suspending your right knee over the floor. Resume your starting position after driving through the left heel. Complete 12-15 reps on both the legs.

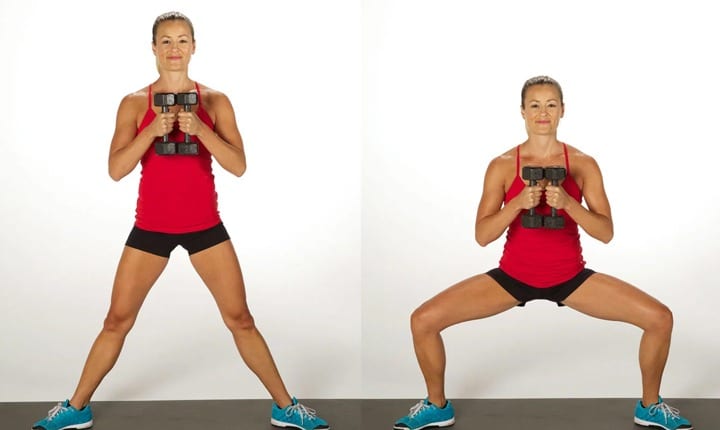
Dumbbell Sumo Squat

Dumbbell Sumo Squat

Your first plan of action in order to perform this hip-strengthening exercise is finding a dumbbell that allows you to squat in proper form while still making you fatigued by the end of the process.

Next, keep your legs wider than shoulder-width apart and stand up as straight as you can. Ensure that your toes are slightly turned out. Hold the dumbbell close to your chest and slowly bend your knees. You will soon find yourself in a squatting position. Finally, squeeze the top-most area of your butt and stand back by pushing through the heels. Repeat the process 8-10 times.

The best part of the dumbbell sumo squat is that you will not only reap the benefits of hip exercise for pain but also the long-lasting effects of weight-lifting exercises as well.

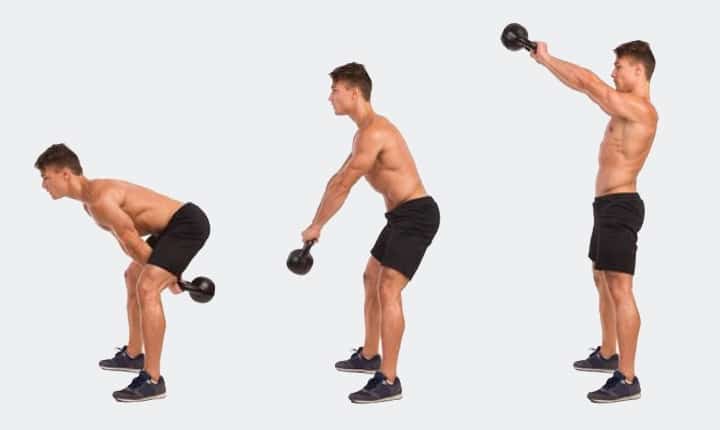
Kettlebell Swing

Kettlebell Swing

The popularity of kettlebell exercises has risen significantly over the past couple of years. And they do have a pivotal role in hip exercises for pain.

To begin, keep a kettlebell on the ground between your feet and stand with our feet shoulder-width apart. Bend your knees, and hinge forward to grab the handle of the kettlebell with both your hands. You will inadvertently find yourself in a squatting position.

Follow this by swinging the kettlebell between your feet. You need to make sure that when you stand back up, you use the momentum to swing the weight up to your chest height. Don’t forget to squeeze your butt when the kettlebell is at the top-most position.

As you get the kettlebell back between your feet, you need to lower your back down immediately. Repeat the entire process 10-12 times.

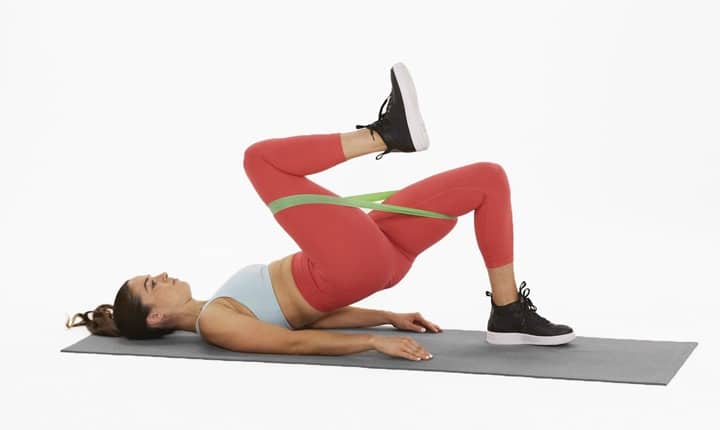
Banded Marching Hip Bridge

Banded Marching Hip Bridge

Get a small resistance band and loop it around your legs and lie down with your face up in front of a step, chair, or bench. Keep your heels on the bench.

Follow this up by squeezing your butt to raise your hips off the ground while pushing through your heels at the same time. Your core must be engaged and your back must stay flat. Bring your right knee towards your chest, hold it for a second, and then put your leg back on the chair or bench. Repeat the same process with your other leg. This entire process is considered one rep. You must do 10-12 reps to gain maximum benefit from this exercise.

Explosive Sprinters Lunge

Explosive Sprinters Lunge

Probably the most fun hip-strengthening exercise that you will have the pleasure of performing, the explosive sprinters lunge is a high-intensity workout. To perform this, you have to stand tall and keep your feet hip-width apart. Next, you need to step your right leg back a few feet into a lunging position.

You then have to explosively jump into the air by pushing through your left leg. While taking the leap, you would have to drive your right knee towards your chest.

Make sure you land softly and immediately return back to the starting position to take another lunge. It should be repeated 5-8 times.

Step Up Reverse Lunge

Step Up to Reverse Lunge

Stand in front of an elevated surface such as a chair, bench, step, or a box. Step on to the elevated surface with your right leg and drive through the right heel and butt to bring your left foot up to the surface. Try to keep your left leg suspended, and keep most of your body weight on your right leg.

Follow this by stepping back down with your left leg and step your right leg back about two feet behind. Proceed to push your left leg back up to the surface. Repeat this process 12-15 times.

Remember, there is no hard and fast rule to follow a chronological order to perform this set of exercises.  Choose your own rhythm based on which order is convenient for you. Just, remember that you must do the warm-up beforehand in order to avoid any injury.

Final Thoughts

Hip-strengthening exercises are more crucial for your health and easier to execute than you think. From avoid terrible pain in your hips when you get old to improving your overall posture, the benefits that these exercises bring with them are numerous.

What is even better is the fact that these exercises are simple to execute and don’t demand any fancy settings or equipment. As such, you can perform them in the comfort of your home. So, get your fitness gear on and work those hips.