Finding the Most Effective Exercises for Knee Pain

Take a look at our detailed workout plan as we help you learn the best exercise for knee pain so that you stay active all the time.

Your knee is one of the most important areas of our body since it connects your leg with your thighs. It is also the largest joint in your body. Unfortunately, it is prone to various injuries and is susceptible to osteoarthritis. Thousands of people across the globe suffer from mild and severe knee pain. Although surgeries and medication you in this regard, we recommend you take the help of some exercises for knee pain because of how wholesome they are.

Today, we are going to help you out in this regard by introducing you to some of the most effective exercises for knee pain that you can do for taking care of your ailing knee. So, let us get this thing rolling.

Best Exercises for Knee Pain

For a very long time, there was a misconception that only older people suffer from knee pain. But, there days, we are hearing people as young as in their 20s suffer from it. Whether you are a housewife or a weekend warrior or an Olympic athlete, no one can assume that they are immune from the attacks of knee pain.

Some of the most common types of knee pain are osteoarthritis, meniscus tears, tendinitis, and sprained knee ligaments. The exercises that we are about to discuss today will not only help you in getting rid of knee pain, but they will also improve your range of motion and overall flexibility.

Remember, the exercise for knee pain doesn’t affect the knee joint directly. Instead, they help in strengthening the muscles surrounding your knee joint. When you have strong muscles, they will inadvertently provide support to your knees. This support will help in alleviating pressures and strains on these joints, which will, in turn, cause relief from pain and in making a person more active.

As per the Arthritis Foundation, regular performing of exercises is the most effective non-surgical way to treat osteoarthritis. With all this information now in your hand, it is time to look into the highly beneficial exercise for knee pain.

Hamstring Stretch

Meant to soothe your hamstrings which are the muscles in the back of your thigh, the hamstring stretch is a very popular exercise that is one of the first exercises that is usually recommended by gym trainers to those suffering from knee pain.

For performing this exercise, you first need to lie down on your bed or a mat if you want to do it on the floor. Try and straighten your feet. If possible, try to bend both of your knees while keeping feet flat on the bed/floor.

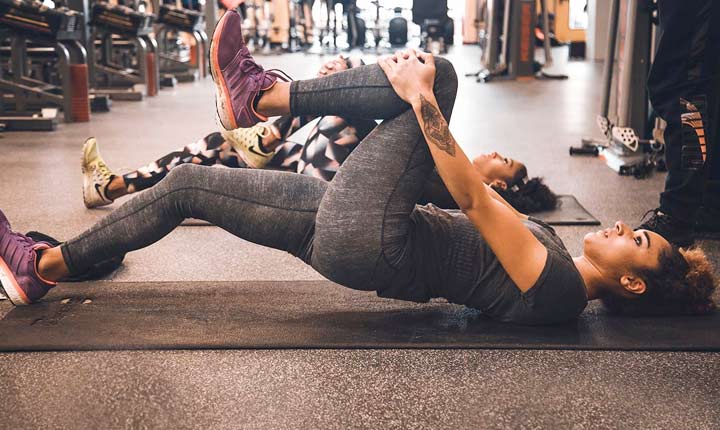
Next, you need to lift one of your legs off the bed/floor. Proceed to put your hand under your knee and behind your thigh. Slowly, pull your knee towards your chest until you feel a modest stretch. Stay in this position for around 30 seconds. Put down your feet and shift to the other feet. Repeat this twice on both sides.  

Heel & Calf Stretch

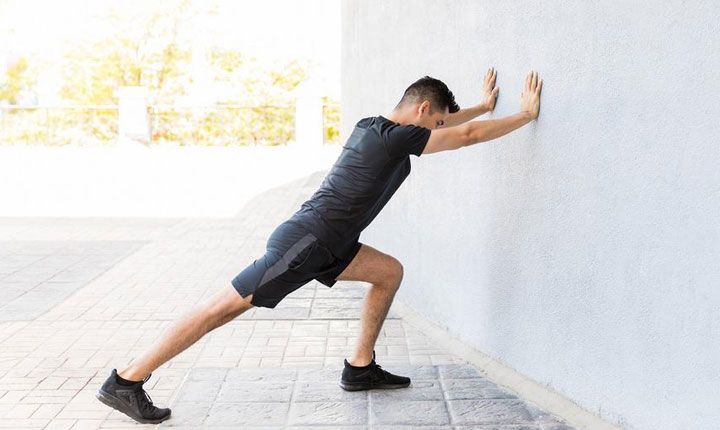
This exercise is meant to target the muscles in your lower leg; to be specific your calf muscles. For this exercise, you need to stand facing a wall.

Next, place your hands on the wall and put one leg behind as far as you can. Don’t incur too much pain while doing so. In other words, put your feet back as far as you are comfortable. Your heels should stay flat and your toes must be faced forward. Slightly bend your knees.

Proceed to lean into the stretch and stay in this position for around 30 seconds. At this point, you will be able to feel the stretch in your back leg. Change your leg and then repeat. Perform this stretch twice on both the legs.

Calf Raises

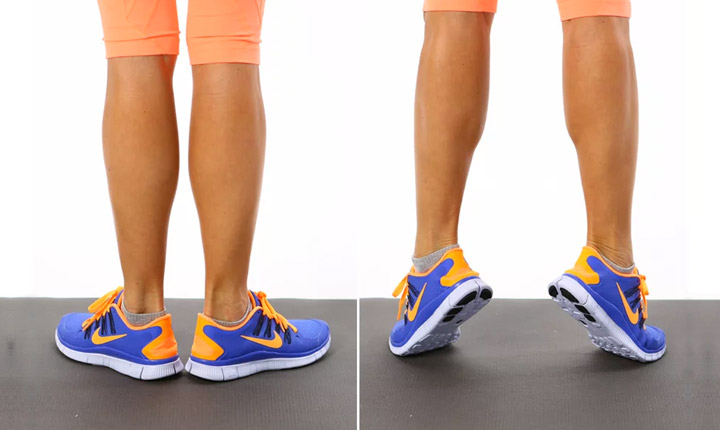
Evident by its name, calf raises is meant to strengthen the back of your lower legs, which includes your calf muscles.

For this exercise, you have to stand with your legs shoulder-width apart. Try and position yourself next to a wall. You can even hold on the back of a chair for support. Next, gently lower your heels to the starting position. Perform two or three sets of ten repetitions each.

Leg Extensions

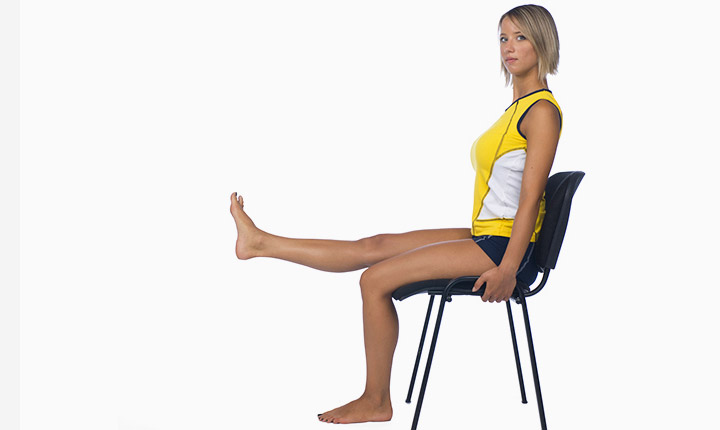
Contrary to the popular belief that you need heavy weights and gym equipment to strengthen your quadriceps, you can use your own body weight instead of a weighted machine when you perform leg extensions. This ensures that the pressure is off your knees.

For this exercise, first and foremost you need to find yourself a chair. Sit up tall in it and put your legs flat on the ground by maintaining a hip-width distance between them.  Make sure to look straight ahead since posture is very important in this knee pain exercise.

Next, extend one leg as high as possible by contracting the muscles of your thighs. You need to ensure that you don’t raise your buttocks off the chair. Pause for a while and then lower yourself to get to the starting position. Perform two to three sets of ten repetitions for each foot.

Hamstring Curl                      

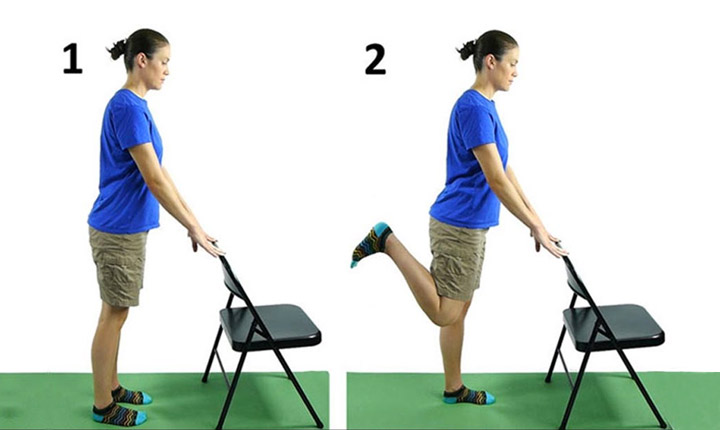
The next exercise for knee pain is the hamstring curl. It targets your hamstrings as well as your glutes. This workout also needs core strength in order to keep your hips and upper body steady.

For performing this exercise, you need to stand up facing a wall. Feel free to use a chair for support. Your legs should be hip-width apart from each other. Raise one leg up while bending your knee and lifting your heel towards the ceiling. Try to go as far as you can without getting too uncomfortable. Remember, your hips should be pointed and your upper body should be still during this step.

Stay in this position for around five to ten seconds. Relax and bring yourself down to the starting position. Perform two to three sets of ten repetitions for each foot.

Straight Leg Raises

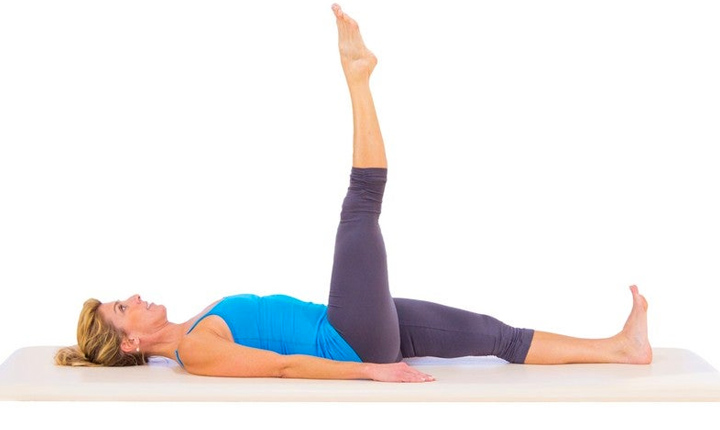
Aimed at strengthening your quadriceps and hip flexor muscles, straight leg raises comes next in our list of effective exercises for knee pain.

When you flex your leg at the end of the move, you would notice your shins getting tightened.  As you get comfortable after a few days, you can add a 5-pound ankle weight to strengthen your feet.

To perform this exercise, you need to lie down on your bed or a mat on the floor. Bend one of your legs and keep the other leg straight in front of you.

Contract the quadriceps of your straight leg and slowly lift it off the bed/floor until it is the same height as that of your bent knee. Stay in this position for a maximum of five seconds before lowering down to the starting position. Perform two to three sets of ten repetitions for each foot.

Prone Leg Raises

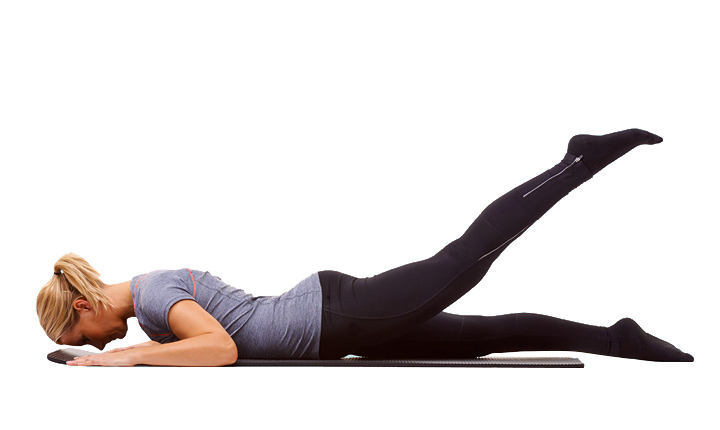
Prone leg raises are meant to work your hamstrings and glutes. Once you get into the rhythm of this exercise, feel free to add a 5-pound angle weight after a few days.

For this exercise, you need to lie down on your stomach on a bed or the mat if you are doing it on the floor. Keep your feet straight behind you. Make sure that your head rests on your arms.

Follow this by engaging your glute and hamstring muscle in your left foot and raise your foot as high as you comfortably can. Don’t put yourself through pain while doing so.  Your pelvic bones should be kept on the floor while performing this knee pain exercise. Hold your foot in the raised position for around five seconds. After that, lower your leg, rest for two seconds and repeat. Perform two to three sets of ten repetitions for each foot.

Half Squat

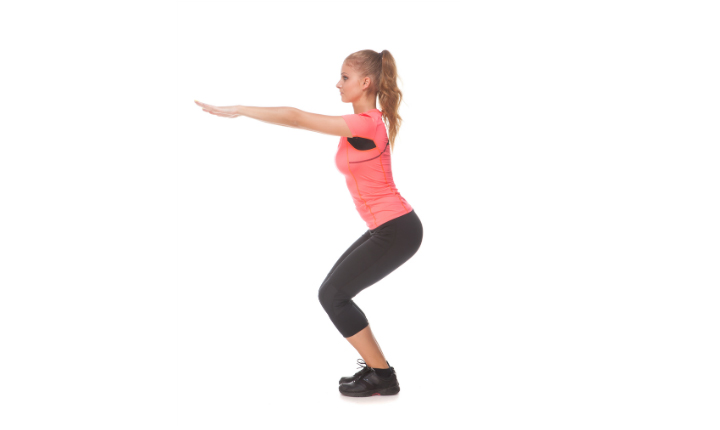
One of the best exercises that target your hamstrings, quadriceps, and glutes, half squats are what we call an all-rounder exercise. On top of that, it doesn’t strain your knees, which is another reason for you to perform this.

For half squats, you first need to get into a standing squat position. Keep your legs shoulder-width apart from each other. Next up, put your hands on your hips or out in front of you, whichever is comfortable to you for finding balance.

Keep your head straight and slowly squat down around 10” (25 cm). This is usually considered to be the halfway point to a full squat. Stay in this position for a few seconds, and then proceed to stand up by pushing through your heels.

Perform two or three sets of ten repetitions of this knee pain exercise.

Summary

No body part should be neglected, especially something like your knee that plays an active role in supporting your body weight and in enhancing your movement. You use it for walking, running, jumping, climbing, dancing, and what not. So, be sure to practise the aforementioned exercises and make them part of your daily workout regime.

However, prioritise the safety of your health first. Although these exercises are safe and can be performed by anyone, we recommend you get a consultation from your doctor, physical therapist or gym trainer regarding the viability of these exercises.  This is because your body may or may not be suited for them and valuable advice from them can help in tweaking modifications in the exercises. So, be safe, keep your knee healthy and moving, and visiting the gym regularly.

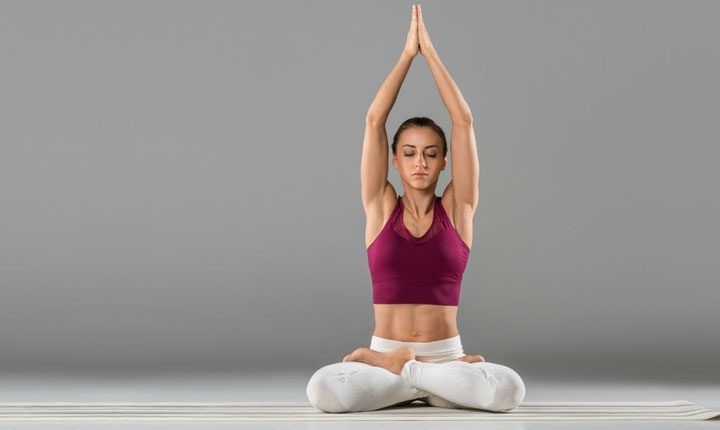
Apart from these exercises, please don’t forget to add Yoga, swimming, water aerobics, stationary cycling, and walking to your knee pain workout regime. These low-impact exercises will help strengthen your knee further. The more diverse knee pain workouts will be, the more benefit you will withdraw from them.

How to Prevent the Most Common Workout Injuries?

If working out is your passion, then you must know about these common workout injuries that may adversely affect your health. Learn how to prevent them.

As much as workouts help in keeping your body in shape and improving your overall fitness, they can adversely affect your body through different types of injuries when you are not following the proper rules.

This is why it is important to have clarity about your own body limits and functionalities. Not everyone is built to undergo all types of workouts. To help you have a clear picture, we are bringing before you a list of the most common injuries that might lead to serious health issues if not treated effectively. In addition, we will also let you know how you can prevent them. So, follow through.

The 7 Most Common Workout Injuries and Their Preventions

Before we begin, there is one myth that we want to break that a lot of workout enthusiast have. People often believe that injuries can only happen to those who are new to the world of fitness and those who have been doing it for years are immune from injuries. Well, if you think that, you couldn’t be more wrong since injuries don’t discriminate between newbies and veterans. Therefore, one shouldn’t get complacent and take these things lightly.

Alright, with that being said, it is time to get into the injuries and their preventive measures.

Injured Ankle

Injured Ankle

You can injure your ankle from anything, whether it’s a simple jog routine or a single-leg exercise. Your ankle is nothing but a mobile joint. It gets injured when you turn your feet inward and/or roll your joint too far. It leads to a situation where your ligaments (on the outside of your ankle) get torn apart.

It can happen when you are doing something as simple as running on a treadmill. It is possible that while running on a treadmill, you lose your focus and accidentally put one leg on the belt while the other one on the side while still being in motion.  You might also injure your ankle by running over uneven terrain or stepping on and off curbs.  

Preventive Measures

Start working on increasing the strength of the muscles of your lower leg and perform ankle flexibility exercises along with it. When you are running on a treadmill, pay close attention while getting on and off the belt. Try and attach the safety clip that shuts down the treadmill if you fall off. Also, if you prefer running outdoors, pick an even, flat surface. When you are running over uneven terrain, keep an eye on your leg placement.

Since this is an issue of your joints, you can’t take it lightly at all. If your pain doesn’t go away within a couple of hours, we highly recommend you visit a nearby orthopaedic clinic.

Lower Back Injury

Lower Back Injury

A lower back pain injury occurs when you strain the muscles around your spine. You will witness a sudden pull or twinge when you do so. It is likely a result of you pushing it too hard. Sometimes, it can even head to disk herniation or nerve compression.

To put it simply, it happens when you lift too much weight while performing deadlifts or squats. Besides, twisting motions and side-bends can also cause lower back injury.

Preventive Measures

To prevent lower back injuries, you need to maintain a neutral spine. Also, before you perform any exercise that involves added weights, make sure to correct your form. Don’t increase your weight load all of a sudden. Be steady about it.

Knee Pain

Knee Pain

Have you ever heard of the syndrome “runner’s knee” (patellofemoral syndrome)? Yes, we are talking about that situation when you hear a crunching or creaking sound of your knees moving through a range of motion.

To start with, it doesn’t affect athletes only. If you don’t align your knee properly while lifting weights or keep on performing weighted repetitions, then you can put your knee at risk. This issue is accelerated through muscle imbalances.

Your knee extensors are sensitive and develop sprain if you suddenly pick up a heavy weight or don’t give it time to rest between weighted repetitions. Running downhill can also stress your patellar tendon, thereby straining your knee.

Sometimes, even weak adductors and hips can force the knee to track inward while performing lunges, squats, jumps, or even running.

Preventive Measures

Try to strengthen not only your hips but also your quadriceps. Stay focused while lifting weights and make sure that your knees are properly aligned. This will strengthen the nearby muscles and protect the extensors.

Rotator Cuff Strain

Rotator Cuff Strain

Rotator cuff strains are also referred to as shoulder injuries.  A rotator cuff is a group of four muscles that help stabilize the support your shoulder joints.

These injuries result from too many repetitions of overhead movements. For instance, if you keep on performing military presses without taking a break, you can end up straining your rotator cuff.  Apart from that, the activities that demand a lot of shoulder mobility from you such as swimming or throwing a ball can also injure your rotator cuff.  The risk of this injury also increases with age as your tendons start degenerating.

Preventive Measures

Ask your personal trainer or doctor to recommend you exercise that will help in strengthening your rotator cuff. Based on their advice, include the said exercises in your upper body program. Avoid repetitive overhead movements, especially the ones that involve heavyweights.

We also urge you to make sure that you maintain a good posture while exercising since when you slouch, you end up compressing your shoulder joint. Don’t put a strain on your deltoids and pectoral muscles and pick weights that are enough for your rotator cuff to work.

Elbow Strain

Elbow Strain

A highly underrated injury that affects more people than you think is the elbow strain. An elbow strain can be of varied types; however, the most common one among them is tennis elbow (lateral epicondylitis). Now, you may think from the name that it won’t affect you since you don’t play tennis. Unfortunately, this injury isn’t limited to tennis players only.

If you happen to lift a lot of heavyweights, then you are a prime candidate to pick up this injury.  For instance, if you are into bicep curls, seated rows, or lateral pull downs, then there is a heavy chance of you irritating your tendons each time you perform an overtly high wrist flexion.

Some other causes for this injury include using improper techniques while exercising and performing similar types of exercises each time you hit the gym.

Preventive Measures

We highly recommend you to keep your wrist in a neutral position while lifting weights to avoid this injury. Alongside that, make sure that you lower the weight that you are lifting if you feel any sort of strain. Also, try and avoid fast repetitions. Adopting an exercise routine that helps strengthen your wrist extensors help in preventing elbow injuries.

Pectoral Injury

Pectoral Injury

People obsessed with strengthening their chest often make the rookie mistake of performing vigorous bench press routines one after the other without taking a break. This can seriously damage your chest by straining it.  This pectoral strain happens due to the extreme pressure that is put on the area.

Preventive Measures

You need to pace the speed of your bench press routine. Don’t overestimate the abilities of your body to withstand everything. Increase the bench press weight steadily over time. Rushing it up is not ideal in any situation.  

Another important preventive measure in this regard is having a spotter or trainer by your side while performing bench press movements. They would ensure that you don’t suddenly drop the weight or lose control.  If you see your hands or wrists shaking while lifting the weight, it is a clear sign that you need to lower down the weight.

Groin Pull

Groin Pull

Groin refers to the area between your abdomen and thighs. Groin pulls are extremely painful and are often experienced while sprinting, squatting or performing lunges. Since your muscles and tissues lose elasticity over time, the risks of groin pulls are higher as you age.

Preventive Measures

It is ideal if you can warm up your inner thigh muscles (adductors) before you start working out. This can involve basic stuff such as light jogging, cycling or even walking. The need for these exercises is especially more before you perform any plyometric movements or any sprints.

Performing clamshells, leg raise, and other similar adductor-strengthening exercises also keep your groin safe in the long run.

To Conclude

Someone has rightfully said that “prevention is better than cure”. Simple tips when kept in mind can lead to a whole lot of positive results. So, just take care of your body and keep it safe while making it fit.

Try and steer away from injury-prone exercises. Your health comes first. Understanding when to stop is a sign of fitness. Going beyond the limits just for the sake of it is less than ideal.

We understand that you want to look great and stay fit, but how would it matter if you put yourself at risk of developing some serious health issue. Therefore, listen to your body, respect it, and stay fit accordingly.

Yoga Poses that Remove Stress and Anxiety

Get into the calm and cool mindset by eliminating stress and anxiety from your life with the help of these relaxing yoga poses that will remove your stress.

Living in this fast-paced and highly-competitive world is no mean feat. In the race of staying ahead of your competitor, often we are plagued with stress and anxiety, both of which can not only take a toll on our mental health but on our overall personality as well.

Whether you are a young adult student or a housewife, whether you are the corporate manager of a well-established firm or a senior citizen looking ways to spend his or her free time after retirement, stress and anxiety can propel in anyone and everyone.  These issues can carve a void in your head that will simply diminish your ability to excel in life. Thus, it is crucial to fight them off at an early stage with some self-help; and what better way to kick them off other than doing some relaxing yoga from the comfort of your home?

Benefits of Yoga in Fighting off Stress and Anxiety

Yoga helps in curbing stress and anxiety by helping you relax. It makes you present in each pose, thereby increasing your concentration and power of control over yourself.  This eliminates any negative mental chatter that is bothering you, thereby elevating your overall mood.

It has established by multiple types of researches that just devoting a few minutes of your day to yoga can have major positive impacts on your life.

Yoga is not just a stress reliever. It can pave the way for easing out anxiety, and even depression.  When you are performing yoga, your attention and focus are transferred to your breath and body. As a result, physical tension is released and anxiety is tampered down. In fact, yoga can also help us in getting good sleep.

We understand that getting into the calm-cool-composed mindset of yoga can’t be mastered in a single day. Take your time! Slowly and steadily, you will get there. You have to permit yourself to fail. Don’t aim for perfection.  Just accept yourself and all your essence.

6 Best Yoga Poses for Removing Stress and Anxiety

Millions of people across the globe suffer from anxiety, making it one of the most common mental illnesses. Today, we are listing out a couple of yoga poses for removing this mental health issue from your life.

However, don’t think that these poses are only for those who have been diagnosed with an anxiety disorder. The truth of the matter is that most of us don’t get our mental health checked. So, you never know whether you are already suffering from excess stress, anxiety, hypertension, among others, or not. It is better to take precautions than cure.

Our bodies can heal and function effectively on its own, but the numerous stressors in our life can slow down, and sometimes even stop this natural healing process. Through the help of the following yoga poses, you can dissolve these stressors from blocking your body’s natural healing system.

Yoga not only provides us physical benefits but mental benefits as well. Here’s presenting the yoga poses you need to try to get rid of stress and anxiety:

Child’s Pose

Child’s Pose

The child’s pose helps relax your stress and fatigue level. It focuses on your hamstrings, rotator muscles, gluteus maximus, and spinal extensors.  

To get into this pose, your first have to sit on your knees and sink back onto your heels. Follow this by bending forward while keeping your arms forward. You can also choose to keep the arms by your side if that suits you. Rest your torso on your thighs and your forehead on the ground. Try holding this pose for around five minutes.

This pose is extremely comforting and has soothing effects on the human mind.

Fish Pose

Fish Pose

Sitting in front of the computer wreaks havoc to your posture, and in turn, your mood. Fish pose yoga helps in providing relief to all the tightness in your back and chest. It takes care of your abdominals, hip flexors, intercostal muscles, and trapezius.

To try this, you need to sit down with your legs stretched out in front of you. After that, put your hands beneath your butt. Make sure you keep your palms facing down.  Next, you need to squeeze your elbows together and expand your chest.  

Proceed to lean back onto your elbows and forearms. Stay lifted in your chest by pressing into your arms. If it suits you, hang your head back towards the floor. If you find this too uncomfortable, you can even use a cushion to rest your head. Hold this pose for a minute.

Triangle Pose

Triangle Pose

The triangle yoga pose works to ease out the tension from your neck and back by focusing on a bunch of different areas in your body such as the hamstrings, internal oblique, quadriceps, gluteus maximus and medius, and latissimus dorsi.

To get into this pose, stand with your feet more apart from one another than your hips. Keep your left toes forward while keeping your right toes at a slight angle. Then, raise your arms and ensure that your palms are faced down.

Next, try to reach forward with your left hand and as you do so, put your torso forward as well. Proceed to bring your right hip back by hinging at your hip joint. Put your left hand to your leg or the floor while extending your right arm towards the ceiling. Feel free to gaze at whichever direction is comfortable for you. Hold this pose for a minute.

Legs-up-the-Wall Pose

Legs-up-the-wall Pose

Next up on our list of yoga poses that you need to try to get rid of stress and anxiety is the up-the-wall yoga pose. This restorative pose is extremely beneficial since it completely relaxes your mind and body.

The areas that are taken care of through this pose are pelvic muscles, lower back, hamstrings, front torso, and neck. If you are a beginner, we recommend starting this pose by sitting beside a wall. Once you get a rhythm of it, you can do it without the help of a wall.

First of all, swing your legs up along the wall and lie back.  Ensure that your butt is close to the wall. Depending on your level of comfortability, you can either keep your butt a few inches away from the wall or stick it completely to the wall.

The main idea here is to soften and relax your neck, chest and back. Hold this pose for ten minutes and de-stress yourself.

Tree Pose

Tree Pose

When it comes to shutting down all the fast-paced negative thoughts that keep on racing in your mind, none works better than the classic tree yoga pose.

Helping you focus inwards, this pose works on your abdominals, quadriceps, tibialis anterior, and psoas.

To get into this pose, stand up and slowly lift your right leg (you can use your left leg as well if that’s what you are comfortable in) off the floor. Next, turn your left leg’s sole towards the inside of your left leg. You then need to put it on the outside of your thigh, left ankle, or calf.

Please make sure that you don’t press your foot into your knee. Proceed to bring your hands in a prayer position. If it interferes with your ability to balance, then you can even hang your hands by your side like tree branches or in any other manner which is comfortable to you. Hold this position for two minutes and repeat on the opposite side.

Extended Puppy Pose

Extended Puppy Pose

Next up is the half-moon pose which helps in relieving tension by lengthening and stretching the spine. It works in your erector spinae, trapezius, deltoids, and triceps.

To achieve this pose, extend your arms forward and push your butt down towards your heels. Then, engage your arms and press into your hands, all the while keeping your elbows lifted.

Proceed to put your forehead on the floor gently. Hold this pose for two minutes.

Final Thoughts

Don’t neglect your mental health. What may seem a simple case of anxiety can turn into something much more serious in the future. Remove the taboo of mental health check-ups and meanwhile allow the soothing nature of yoga to take care of your stress and anxiety.

To get the full benefits of yoga, get yourself enrolled in a certified gym such as Starmark Fitness Studio, which is considered one of the best gyms in Kolkata. Talk to our yoga practitioners and learn from them which yoga pose is suited for you and how you can achieve maximum benefit from them. It is important to learn about your own body so that you can provide it the right treatment. Keep in mind the fact that when you have proper guidance, the road to healing becomes much more convenient.

So, de-stress yourself, remove all the negative vibes and energy from your body, and tackle tension and anxiety with yoga.

A Definitive Guide to the Best Glute Exercises

If you want to get strong and firm glutes, then you need to familiarize yourself with the best glute exercises. Learn how to perform them in detail.

One of the most common reasons for people to enroll in a gym is to strengthen their glutes. After all, who doesn’t want tighter, firmer, and well-shaped glutes? Not only do they make you more attractive, but they have health benefits as well since they support your lower back. Therefore, to help you out with the same, today we are listing out some of the most efficient glute exercises that will give you the glute of your dream.

But before we find out about these exercises, let us try and understand how exercises can help shape your glutes. It will help you to understand your body better. Your butt is not made of one muscle only, and a lack of knowledge regarding your glutes will stop you from exploring your full potential.

Understanding Your Glute Muscles

As we stated above, your butt is not made one muscle only. There are, in fact, three muscles that shape up your butt. These three muscles each have distinct roles and can be activated to varying degrees based on the type of exercises you are performing, the position of your body, and your range of motion. The glute exercises focus on these three muscles to shape up and strengthen your glutes. These three muscles are as follows:

Gluteus Maximus

Responsible for extending your legs/hips forward, the gluteus maximus is large in size and is the one where most of your focus should be on while performing glute exercises since it holds the most potential (apparent from its name) for growth.  

This muscle is used for walking, running, thrusting, and for performing deadlifts, glute bridges, bird-dog exercise, among others.

Gluteus Medius

Next up is the Gluteus medius which sits directly below the gluteus maximus. Its primary function is to stabilize your pelvic activities. It helps your thighs to move away from the body during movements.

This muscle stops our pelvis from dropping to the other side when we are running or walking up the staircase.

Gluteus Minimus

The smallest glute muscle in your body, the gluteus minimus is located underneath the gluteus medius. It helps in the rotation of the hips apart from acting as a hip stabilizer.

Now that you a fair idea of the glute muscles you need to take care of, let us familiarize you with some of the most efficient glute exercises out there.  

The Best Glute Exercises That You Need Check Out

First of all, we want to tell you that everyone’s body type is different and the exercises that you perform will be governed by multiple factors including the condition of your health, past injury history, among others. Therefore, it is suggested to always workout under the supervision of a trained professional. The best multi-gyms in the country provide consultation from certified trainers who task you with exercises that are best suited for you.

Nonetheless, the exercises that we are mentioning in this list can be mostly performed by anyone, but still, get consultation beforehand.

So, here are some of the best glute exercises for you:

Deep Squats

Deep Squats

Deep squats play a pivotal role in activating the gluteus maximus, especially when compared to partial and parallel-depth squats since they only focus on the quads instead of the glutes.  

It helps if you begin this exercise with weight in the form of barbells, although you can do it free-hand as well.  So, first of all put the barbell on top of the back of your shoulder. Keep your head and chest straight. Make sure that your legs are wider apart from each other than your shoulder width.

Next, lower your butt back down while bracing your abs. Just pretend that you are sitting on a chair. Put the weight on your heels and go as below parallel as you can while keeping your back straight. Many people make the mistake of tilting their pelvis. Avoid that at all costs.

Hip Thrusts

Hip Thrusts

Known as the ‘gluteus maximus booster’, hip thrusts are built around the hip extension movements. This is a very injury-friendly exercise since it doesn’t involve putting weight on the back.

To do this, start by sitting on the floor and keep a bench behind you. Next, keep a loaded barbell over your feet near your hips. For ensuring comfort, you can even use a pad on the bar. Follow this by leaning back against the bench.

Star moving by extending your hips upward by driving through your heels.  Keep extending as much as you can (without overexerting your body, of course). Get back to the starting position by reversing the motion.

Kettlebell Swings

Kettlebell Swings

Another exercise that is pretty much safe to perform since they don’t impose any stress on your back is the kettlebell swing. Some personal trainers even call it a self-sufficient exercise, meaning you can perform only this and not have to worry about performing other glute exercises.

To perform kettlebell swings, you need to start by leaning forward to place both of your hands on the kettlebell. Please ensure that your core is engaged and your back is flat before leaning forward.

Also, your legs should be wider apart from each other than your hip-distance. Slightly bend your knees and drive the hips back. Next, drive your hips forward as you swing the kettlebell. Both your glutes and core should be engaged. The main idea is to maintain a sense of fluidity in your motion.

Many people assume that the motion should come from their quads or arms, but that is not true. Your hips should generate the motion. The weight has to be lowered back down in between your feet and based on your level of comfort, should be swung for desired reps.

Deadlifts

Deadlift

We should begin discussing this exercise by stating that this is not only a great exercise for your glutes but also your entire lower body strength.  However, if not done under strict supervision, it can cause serious injury. So, be cautious!

For doing deadlift, you need to stand close to the bar you are about to lift. Make sure that your shins graze the bar.  It also has to be centered over your legs. Keep your legs hip-width apart from each other.

Slowly and steadily, bend down from your hip to grab the bar at shoulder width. Your core must be braced and back should be flat. Next up, you need to flex your knees and lower the hips. To move the weight upward, you need to drive through your heels.

Once the bar passes your knees, pull the bar back by generating a hip-thrusting motion that drives your hips forward.

To put the bar back to the ground, bend your hips to ensure that your lower back doesn’t have to endure any excess load.  We strongly suggest avoiding this exercise when you are alone. Do it with your fitness trainer or with your peers because of the risks involved.

If you need more information on doing deadlift, here’s our detailed deadlift guide.

Quadruped Hip Extensions

Quadruped Hip Extensions

Quadruped hip extensions are extremely underrated, especially by those who are new to the whole fitness world.  Its potential for activating the glutes is far-reaching.

To do this, you need to get on your knees and hands while bracing your abs and keeping your back neutral.  Follow this by driving your feet upward so that your knee is kept at a 90° angle throughout the movement.

Your knee, thigh, and hip must be properly aligned to the ground and your leg should face the ceiling. Before switching to the other side, please ensure that you repeat for all reps by lowering back down.

There a couple of things that you need to keep in mind while performing quadruped hip extensions.  First of all, do not arch your back at any cost.  You have to make sure that your spine and neck are aligned with each other. By that, we mean straight alignment, not upward alignment.

Secondly, you can increase the intensity of this exercise by holding a lightweight dumbbell behind your knees or by adding ankle weights. As with all other exercises mentioned on this list, don’t overestimate yourself. Start slow!

Wrapping Up

Glute exercises are not for giving you a desirable appearance only. They help in strengthening your glutes. If you keep working on the other areas of your body and neglect your glutes, you will put yourself in a vulnerable position. Your glutes support your lower back. So, ensuring that they are tight, firm, and strong is essential for every fitness freak.  

For people who spend a significant amount of their time sitting in front of a computer, glute exercises are necessary for them as well since it is your glutes that hold the pelvic together. So, when you don’t move around much or not engage in too much physical activity, you might develop pelvic instability. This can not only be painful, but also affect your ability to walk, run, and even stand effortlessly in the future.  So, work your glutes for a better and healthy fitness life.