How to Do Deadlift – An All-Inclusive Deadlift Guide

Deadlift is one of the most intense forms of exercises out there. So, let our deadlift guide come to your aid so that you can master the workout.

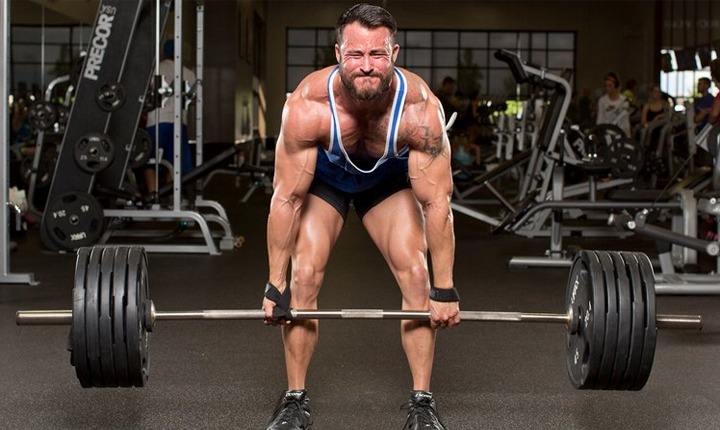
Considered to be one of the most wholesome, rewarding, and intense exercises out there, deadlifts are quickly becoming one of the most practiced forms of exercise among gym enthusiasts. Whether it is your gluteal muscle or your hamstring, your quads or your lower back, a deadlift makes sure it’s positive effects are seen all across your body. However, you can subject yourself to serious health hazards if you don’t know how to do a deadlift.

So, to help you out with the same, we have brought forward a deadlift guide that will help ensure you reap the most benefits out of this exercise while following necessary precautions.

How to Do Deadlift – A Detailed Deadlift Guide

How to Do Deadlift

Deadlift essentially refers to the lifting of the dead weight (weight without momentum) from the ground. In this exercise, all repetitions start with dead weight, which is a rarity when it comes to standard weight training exercises. If you are looking for the answer as to how to master deadlifts, you need to adopt the following five-step approach.

Step 1 – Take your starting position, which is keeping your mid-foot below the bar. Please make sure that your shins do not touch them yet. Keep your toes out at a 15° angle. Your heels should be hip-width apart; however, they must be narrower than how they are when you squat.

Step 2 – The second step in our deadlift guide involves you bowing down by bending your feet. Get a good grip on the bar and maintain a distance of shoulder-width in between your two hands. In addition, you have to ensure that your arms are vertical when viewed from the front.

Step 3 – Bend your knees until you are able to touch the bar with your shins in order to drop into your next position. Beware; not to let the bar go away from your mid-foot. In case it moves, you have to resume again with the first step. This would help to avoid injuries.

Step 4 – Raise your chest and straighten your back. In this step, you should also make sure that your mid-foot stays underneath the bar. Place your shins against the bar and your hips where they were.

Step 5 – Now, to the final and most important step – the lift.  Relax, take a long breath, hold it in, and then stand up with the weight. Please ensure that the bar remains in contact with your feet when you pull. Avoid leaning back or shrugging at all cost. Furthermore, lock your knees and hips.

In order to release the weight back, you just have to unlock your knees and hips first. Proceed to lower the bar by pushing your hips backward. Keep your feet straight during this process. Bend your feet further once you realize that the bar is past your knees. You will notice that the bar will land above your mid-foot.

Do not forget to rest for a second in between each rep. Stay in your setup position with your hands placed over the bar. Take a long breath, tighten up, and pull again. Remember, each rep must begin with a dead stop. Never bounce the heavy weight off the ground.

8 Areas to Focus on for Mastering a Deadlift

Body Parts to Focus While Doing Deadlift

In order to fully understand how to master a deadlift, you need to pay attention to these following areas. Of course, everything can be overbearing initially, given the effort this exercise demands from you. But, if you follow our instruction in each of these areas, you will soon adjust well to the mechanisms of this exercise.

If you go and speak to the fitness trainers of some of the best gyms in Kolkata, you will notice that they heavily stress on taking precautionary measures while performing an exercise of this caliber. So, without further delay, please focus on these following key areas.

Hips

The position of your hips for deadlifts will be determined by your body structure. People with long thighs have to position their hips higher than those with short thighs.

The funny thing with hips is that it gets into its position on its own when you correctly align your other body parts. As long as you keep your mid-foot underneath the bar and keep bending your knees until your shins touch the bar while grabbing it, you will see that your hips have been positioned where they are supposed to get positioned. Of course, this has to be accompanied by raising your chest.

Arms

A lesser-known trick with deadlifts is that when you are gripping the bar narrow, at about shoulder-width apart, you will be able to pull more weight. During your setup, your arms must incline from the side.

Do not forget to lock your elbows and straighten your arms before pulling off the weight from the ground, and keep them straight during the entire process until the lockout. The golden rule of deadlifts is to let your back muscles and legs lift the weight rather than your arms since arms are not build to lift such weights.

Feet

When you are setting up the bar, make sure that it is placed over the middle of your foot. This is crucial because your mid-point will act as the balance point. Remember to avoid setting the bar above your toes.

In essence, you will lose your balance if any part of your foot comes up during this whole process. Therefore, you have to always keep your mid-foot, heels, and toes down.

Shoulders

Keep your shoulders in front of the bar while setting up for a deadlift. Avoid keeping your shoulders above the bar since that puts your hips too low. Furthermore, it will also make your shins and knees come too far forward, thereby causing you to hit them on your way up.

In addition, always relax your shoulders. You don’t have to roll them up or shrug them during deadlifts because it may severely affect your shoulder joints. Let your feet do the work of lifting up the weight instead of your shoulders.

Bars

The next lesson in our deadlift guide focuses on the bar.  You need to make sure that the bar leaves the ground exactly from your mid-foot on every rep.

The goal is to follow the shortest distance to reach the lockout, which you can achieve if you move up in a vertical line. So, naturally, you need to avoid horizontal bar movements because they will, without a doubt, lengthen the bar path.

Also, make sure that the floor is even and the bar is still before starting each rep. It is recommended to reset if the bar moves away from your mid-foot while setting up or in between reps.

Stance

Having a proper stance is vital for getting the rewards from this compound exercise. To achieve the perfect stance, you need to set up your heels hip-width apart. This means the wider or narrower your hips are, the wider or narrow your stance will be. The basic idea here is to create a space for your arms in order to stop them from getting blocked by your feet.

Another point you need to keep in mind is to not practice deadlift with a squat stance. A correct stance or posture will also drastically reduce the chances of you getting injured.

Knees

When you are performing a deadlift, you need to push your knees out during the setup in the same direction as your toes. The toes must point out at a 15° angle.

Following this rule will help engage your groin muscles. An underlying aspect that takes place here is that it allows for more of your muscles to work together; which naturally contributes to you being able to lift more weight.

Head

Keep your neck neutral while performing deadlifts.  The goal here is to have a natural inward curve in your cervical spine. You also need to keep your spine neutral so that there is equal pressure on your spinal discs.

Do not look up to the ceiling when you are performing deadlifts since it will squeeze your spinal disc and result in a bad deadlift form.  At the same time, do not look down as well because it will relax your upper-back and make it more likely to round up.

Try to look at a point on the floor that is in front of you since it will create a straight line from your hips to the top of your head. It is often an overlooked aspect of this exercise, which needs to be taken care of.

Summary

Similar to other exercise forms, deadlifts can be as dangerous when performed incorrectly as they are beneficial when they are done with the right procedure. Since it deals with a huge amount of weight, the risks are greater. Thus, you have to be extremely careful when it comes to its technicalities. We hope our guide of how to do deadlifts will position you better in performing this exercise like a pro. With that being said, we highly recommend you get professional help from a gym trainer, especially if you are new to this.

A Detailed Pull-Up Guide – How to do Pull-ups in Proper Methods

A pull-up is only effective when done in proper form and method. Master the art of Pull-Ups in a step-by-step process in our pull-ups guide for beginners.

When it comes to strengthening your upper body, nothing compares to the impact of pull-ups. One of the most popular forms of exercise out there, it is a must for every gym enthusiast. However, despite its massive popularity many people still struggle to figure out how to master pull-ups, which is why we are here to help you get acquainted with this age-old fitness regime that is as effective today as it was years ago.

How to Do Pull-Ups – A Step-by-Step Guide

Almost every best gym in Kolkata heavily recommends including this exercise in your workout regime.  The basics of a pull-up guide can be mastered if you adopt a systematic approach by following the steps mentioned below.

Step 1 – Start with grabbing the bar and making sure that you grip it about a shoulder-width apart. You also need to ensure that you have a full grip over it while having your palms faced down.

Step 2 – Next, you need to raise your legs off the ground by bending your knees. Keeping your arms straight will ease the process.

Step 3 – The third step involves you pulling yourself up by pulling your elbows down to the ground. Elbows must be kept closed here.

Step 4 – The fourth step is the hardest one which basically makes pull-ups so difficult than other forms of exercise. You need to pull yourself all the way up until your chin passes above the bar.

Step 5 – The fifth step in how to do pull-ups is you getting back to your starting position. After pulling yourself above the bar, you need to lower yourself all the way down until both your arms are straight back again.

Listen, it’s totally understandable if you can’t get it right on your first few attempts. In fact, it’s completely natural since lifting up all your body weight is no mean feat.

During your initial days of trying pull-ups, you can do what is known as negatives pull-ups. This means that all you need to do is just get your chin above the bar by, let’s say, standing on a stool or a bench. Feel free to seek assistance from a friend or your gym trainer by asking them to hold your legs during the process.

Okay, now that you have a fair knowledge as to how to do pull-ups, let us point out the key focus areas you need to work upon while performing a pull-up.

Areas to Focus on for Mastering a Pull-Up

While doing pull-ups, you need to focus on the following areas to ensure you get the maximum benefit out of it while avoiding injury at the same time.

Chest

Remember, to always pull yourself up by leading through your chest. An easy way of ensuring this is to touch the bar with your collarbone every time you pull yourself up. The basic idea here is to avoid your shoulders to roll forward.

Lower Back

Your lower back must be kept neutral, meaning; it should neither be over-arched nor flat. Don’t squeeze your spinal discs or hyper-extend your arch. Keeping your ribcage down will help you stay neutral. In addition, your shoulders and knees must create a straight line when aligned.

Elbows

One major mistake people make while performing pull-ups is, when they bend their arms at the bottom when they start the exercise. You always have to ensure that your arms are straight and your elbows are locked when you hang on the bar.

Also, you need to completely lower yourself down after pulling yourself up. Naturally, since the range of motion will be longer here, you will get multi-fold benefits out of it. Don’t forget to keep your elbows close to your torso. To be specific, your elbows should touch your lats or your ribcage should point towards a 45° angle.

Grip

Pull-Ups Guide - Grip

Having a good grip helps make your pull-ups smooth and functional. The main thing you need to focus on here is to ensure that you put your thumbs around the bar. In addition, squeezing the bar tightly would help from you slipping off it.

What essentially works here is that the tighter you squeeze the bar, the more your shoulders and arms get contracted, which essentially means the more strength you gain and the easier the pull-ups become.

Another trick to follow here is to hold the bar high in your hands while closing your fingers. Keeping your palms face up will target your lats and upper backs.

Head

Pull-Ups Guide - Head

Make sure you always look forward while performing this exercise. Contrary to popular belief, do not look up at the bar or the ceiling. Not to mention, tilting your head is also a strict no-no here. Keeping your head in line with the torso is the goal here.

Following this rule will ensure that there’s no squeezing of the spinal discs in your neck. As a result, you can bid farewell to all those horrible post-workout neck pains from doing pull-ups.

Legs

Performing pull-ups with straight legs will keep your lower back neutral. The only aspect that will stop you from following this rule is low hanging power racks, which are predominant in most gyms.

You just can’t keep your feet straight on these low racks because they would inadvertently touch the ground. It is just one of those disadvantages that you have no control over. However, there is a partial solution to this problem. If you straighten your leg down as you pull yourself up, it will keep your lower back neutral. You can bend your legs as you come down.

Bottom

Before you pull yourself up for your first rep, you need to hang with locked elbows and straight arms. Stretch your lat muscles and back as much as you comfortably can. Shrug your shoulder towards the ceiling.

After taking a big breath, you need to pull yourself up by pushing your elbows down. Next, you have to lower yourself until you see your arms are locked again.

Different Variations of Pull-Ups

Diversity in fitness is extremely essential to help get rid of a sense of boredom. Thankfully, we have a bunch of variations in pull-ups which, although are seemingly similar to pull-ups, are significantly different from them in terms of functionality. Take a look at some of them below.

Weighted Pull-ups

As you must have figured out from its name, weighted pull-up exercise means performing pull-ups with extra weight on your body. The objective here is to improve your endurance and strength and increase your overall muscle mass.

To perform this, you have to use a dip belt. It is a type of belt with plates that comes with a chain. You can tie this belt around your waist. The chains will reach the holes of your plates, and it has to be hung between your feet to the belt around your waist.

Chin-ups

Chin-ups are almost as same as pull-ups. The only difference is that in case of chin-ups, you grip the bar with your palms up rather than keeping them faced downwards.  Technically speaking, chin-ups are easier to perform since they make use of your biceps more. They are an absolute favorite of those who prefer having bigger arms.

Lat Pull-downs

In the case of lat pull-down, you need to hold the cable bar just like you hold the bar while performing a pull-up. Make sure that when you sit on the bench, you have your thighs blocked underneath. Follow this by pulling the cable bar towards your upper chest while bending your arms.

Lat pull-downs are easier to perform than pull-ups because you get to put less weight here than what you actually weigh. In contrast, pull-ups force you to lift your entire body weight which can be pretty intimidating for a beginner.

Assisted Pull-up Machine

Assisted pull-up machine is an exercise machine that helps you perform pull-ups.  To set it up, you have to grab the handles just like how you hold the bar during pull-ups. You then have to rest your knees on the designated knee padding.

As the machine lifts up the knee padding, you need to pull yourself up. To be specific, the machine helps you on your way up by making use of counter balance-weight. To get more help in pulling yourself up, you need to set the weight higher up.

Now, although this sounds exciting and easy, avoid it as much as you can since it is not as effective as actual pull-ups. This is because you are resting on a platform when you are using it. As you are not balancing yourself, you are using fewer muscles. Your lower back and abs are basically not getting worked up at all. In addition, you are not stretching yourself.

Summary

Pull-ups are a great source of gaining upper body strength.  This is why it is a mandatory component in almost every kind of workout regime. But if you don’t have proper knowledge of how to do pull-ups, you will end up jeopardizing your health since you will gain no strength, and lose all your energy, all the while making yourself susceptible to injury. Thus, following a systematic, planned, and a safe approach will help you to achieve more and you will end up witnessing positive results in your body.

5 Bad Gym Habits You Need to Change Right Now!

Are there some bad gym habits that you repeat at your nearest multi-gym? Brush your ideas to find the best ways to change those wrong gym habits right now.

When accomplishing your fitness goal is the one and the only plan behind joining a gym then why should we waste time in chit-chatting with other gym members and getting accustomed to some wrong habits during exercise session? No, your behavior and activities are not blamed here, instead, you are just suggested to change a few bad workout habits while visiting your nearby gym regularly.

There is no doubt that you are striving hard and shedding sweat to get a well-shaped physique, balance your Body Mass Index (BMI) and burning your long-stored stubborn calories. However, you just need to bring passion and seriousness while doing a workout in any evening or early morning gym near you.

Remember, your wrong habits and laziness during workouts can spoil the mood of your gym trainer, make you demotivated and divert your direction from setting board in a fitness target. So, be motivated and focus while keeping your footsteps on the stairs of your nearby fitness center.

Bad Gym Habits and Ways to Get Over Them

Focusing on your fitness regime and goal is not only the thing you need to do, but you need to change some bad habits which may cause trouble to others and also ruin your image in front of your gym mates and the fitness trainers.

There are some bad habits that are needed to be changed when you are practicing workout in the best multi gyms of Kolkata or other cities because your habits and behaviors present your persona in front of others. Take a clear look at a few wrong gym habits and the tips of fitness experts to fix such problems:

1. Using Phone during the Workout Session

In this generation, people are becoming more and more tech-savvy, and they cannot live without technology for a minute. But we all know the health issues because of this habit and tech-addiction.

While visiting a gym or practicing workouts, some people have a very bad habit of talking or chatting over their phone or tabs. If you are also one of them then immediately stop this habit. This will divert your fitness goals and the money invested in your workout session will be in vain. Hope you don’t want that!

Keeping yourself busy in using the phone will demotivate you from the workout sessions and you will never achieve a fruitful fitness target because of this bad habit. So, reduce mobile usage as much as possible when you are doing exercise.

Yes, phone calls are necessary but when you are going to a gym keep your phone aside or in a bag. Just take necessary calls if required because your health management is your responsibility. If you do not put much heed in that then you will not get the result for several years.

2. Staring Long at the Gym Machines While Someone is Using it

If you have taken admission to a gym then make sure you have to share the machines with other gym members and you also have to keep patience when others are using any machine or equipment.

Some people have a very bad habit of stalking or staring long at the machines when someone is practicing workouts. Waiting is all right, but making your fellow gym mate uncomfortable by staring at him or her for a long time is not a courtesy.

Everyone in your nearby multi gym is just to fulfill their fitness aims like you. So, you need to understand the thing without being selfish and rude. Take your time while using any equipment or machine and also make the same scope for others without chasing them.

Ask the trainers of the gym to find other machines for you if you are in a hurry or perform some stretching, warm-up and manual workouts when you find a treadmill or cycling machine busy.

3. Stinking or Wearing Smelly Clothes during the Fitness Session

It’s quite natural to shed sweat while doing any kind of exercises whether you are practicing manual workouts or running in a treadmill. No problem! You are there to sweat more and shed more because it is required to remove toxins from your body.

Now, if you sweat then it is quite obvious that you will stink and your gym mates along with fitness trainers will feel annoyed to come near you because of the bad odor. There are bad habits such as, repeating the same smelly clothes every day in the gym without washing them and not carrying deodorant or perfume in the gym.

Don’t think much guys! You really don’t have to put much effort, just wash your gym garments and wear other comfortable clothes while going to a gym. Remember, this is not only for others but also for you because you should never forget the way to maintain hygiene and stop infections in the craziness of accomplishing your fitness aim.

Also, carry a towel and a pocket deodorant with you while going for your workout sessions to diminish the bad odor from your body. If you visit any reputed multi gym in Kolkata like Starmark Fitness Studio, you will get separate shower rooms where you can easily take bath after your workout session and change your clothes to feel fresh. Moreover, you can keep alternative shoes and clothes in your personal locker of the gym.

4. Not Wiping the Gym Machines after Using

You are not only the one who runs the treadmill or strokes legs in a cycling machine. There are other people as well who wait to practice it after you. It is often seen that a few people use the machines for a long time and after that, they don’t wipe out the sweat dropping from their hand or body on the machine.

Do you feel, how awkward and disgusting the person can feel who will use the same machine after you? Try to keep yourself in his or her place and now say how you will feel. No, the motive is not to show your fault because of this habit but the main fact is to get you acquainted with the knowledge of gym etiquettes which all fitness freaks should follow.

Be in your manners by wiping out your sweat by any cloth piece or your towel after using the machines. Remember, if you show your conduct and care for the hygiene of others, your gym mates may also care for you whenever you need. The big multigyms in Kolkata and other places always provide you a towel that you can use personally to wipe out your sweat and the machines engrossed with your sweat.

5. Chewing Gums While Practicing Workout in Gym

Yes, fitness experts suggest chewing gums and hard sugar-free candies to cut the flabby areas of your face, remove double chin and create an attractive jawline but not during the workout session.

The idea is to get a sharp jawline and balanced cheeks but without damaging the other parts of your body or creating a breathing problem. As per the expert health coaches, you need to breathe in and breathe out during workout sessions. But while chewing gums, you are missing that thing and not breathing naturally. This will never give you a positive fitness result and also create trouble in your respiratory system.

So, apply other ways to cut fat from your face by doing face gym and double-chin exercises. If you really want to chew something for having a toned face, chew fennel seeds or sugar-free gums. Fennel seeds are better than gums because it will help you digest naturally and the long hours chewing process will definitely help you with a chisel-shaped jawline.

Whatever you are chewing, don’t chew it during workout sessions. Do it after going out of the gym or other times because having normal breathing is the mandatory thing for practicing exercise and gaining fruitful results.

Ending Note

Whether you are an aspiring fitness freak or a professional fitness trainer in a reliable multi gym of Kolkata, mistakes are common for all. You don’t need to repent for such follies, just be smart enough to change the wrong gym habits to get better results and make the ambiance of workout soothing. Health experts suggest to enjoy workouts but do not get demotivated from the target that you have already set for your health.

10-Minute Workout to Fit Into Your Jeans

Don’t have time in hand yet still want to learn effective ways to fit into your jeans? Here’s the guide for a 10-minute workout to lose weight.

In the extremely fast-paced world that we live in, we are always looking for economical methods to resolve our problems and needs. Be it the concept of two-minute noodle or just brushing on the headlines of a newspaper; we are always on the run to look for efficient time-saving ways. The same is reflected in those of us who struggle to fit into our favorite pair of jeans. However, if you can spare ten minutes of your valuable time, then we might have the answer to your problem. Here’s presenting before you the regime of a 10-minute workout to lose weight so that you can fit into your jeans easily.

All of us have that one pair of jeans in our wardrobe that mocks us every time we try it on before heading out for a party or the movies. It hangs in there taunting us for the extra flab on our body – the ‘muffin top’ – as some would address it as. Since spending two hours in a nearby multi gym is not always the option, therefore we have devised for you a plan of 10-minute workout to lose weight that you can practice at home; you don’t have to run to a gym near you. This regime will not only help you get into that particular pair of jeans but will also save you a lot of time which you can utilize to do your other activities.

10-Minute Workout to Lose Weight

The following workout regime by fitness trainer and cyclist Kym Perfetto is a step-by-step guideline that you need to perform in a chronological manner in order to avail the most benefits out of it. Starmark Fitness Studio, a leading gym in Kolkata, has even approved of this new-age workout session.

Warm-Up

Just like any other workout, this regime also requires you to get warmed up beforehand. It basically comprises of the following:

Cobras

Cobras - 10-Minute Workout to Lose Fat

To do this, you need to lie on the floor with your face down and palms flat on the floor under your shoulders. You then need to inhale to press your palms and lift your chest from the floor while pulling your shoulders back.

Make sure your head is extended towards the ceiling. After this, slowly exhale and lower your body to the starting position. Repeat this five times.

Extended Cobras

Extended Cobras - 10-Minute Fat Loss Exercise

As evident by its name, you can figure out that this is an extended and detailed form of Cobra.  For this, you have to lie face down on the floor while keeping your palms flat on the floor. Please ensure that your forehead rests on the fingers.

Relax and inhale to lift your chest. Keep extending your arms backward next to your hips, to make your fingertips reach the end of your toes. Exhale while lowering your chest and return to your starting position.

Once you are limber and ready from the warm-up, move on to the three-stage process of our 10-minute workout plan to fit into your jeans.

Stage One

After your warm-up, your routine of the 10-minute workout to lose weight officially begins with stage one. This stage is composed of the following:

Bicycle Crunches

Bicycle Crunches - Fat Loss Workout

For bicycle crunches, you have to lie face up on the ground with your hands clasped behind your head. Keep your elbows pointed out to the sides. Proceed to lift up your shoulders and legs to hover off the ground and drive your right leg towards your chest and rotating torso to drive your left elbow to your knee.

Once you complete, switch up by extending your right leg and driving your left knee and right elbow towards the center. Keep on alternating between them. Repeat this 20 times, counting each side as one repetition.

Plank Bird-Dog

Plank Bird-Dog - 10-Minute Workout for Weight Loss

The next part in the first stage of the 10-minute workout to lose weight consist of the plank bird-dog. To perform this, you have to start in a high plank position. Make sure you keep your core tight and continue to maintain the plank position as you lift your straight arm to extend it forward. Lift your left leg in a straight position as high as possible in the same manner.

After this, come back to your starting position and repeat on the other side, lifting your left arm and right feet. Similar to bicycle crunches, you also need to repeat this 20 times, counting each side as one single repetition.

Once you are done, repeat both bicycle crunches and plank bird-dog one more time.

Stage Two

The second stage of our 10-minute workout to lose weight has been built in a manner that would complement the rhythm of the first stage. It consists of the following:

Side Plank Toe-Touches

Side Plank Toe-Touches - Weight Loss Workout

To do a side plank toe-touch, you have to start on a right side plank while resting on your elbow with the fingertips pointed forward.  Keep your arm extended overhead so that your biceps lies next to your ear.

You then have to bring both your left feet and left hand forward in a straight position so that you could touch your toes with your fingertips in front of your belly button. After returning to the starting position, complete 20 repetitions on each side.

Mountain Climbers

Mountain Climbers - Short Interval Weight Management Workout

The next part of the second stage of your 10-minute workout to shed weight involves the mountain climbers. For completing it, you have to first of all start in a high plank position. You then need to drive your right knee towards your chest. Proceed to return to high plank and draw your left knee towards your chest.

Please ensure that you continue to alternate at a relatively fast pace (not high speed though since it might injure you) while keeping your core tight and hips in line. As with every other exercise mentioned so far, you need to repeat this 20 times as well, counting each side as one repetition.

Similar to stage one, the two exercises of this stage – side plank toe-touches and mountain climbers – should also be repeated.

Stage Three

Keeping in mind the flow of the first two stages, the third and final stage also consists of two parts. They are as follows:

Plank Twists

Plank Twists - Short Interval Fat Loss Exercises

Plank twist is the first part of the final stage of your 10-minute workout to fit into your jeans. This exercise requires you to start on an elbow plank. Slowly proceed to rotate your hips to the right, lowering it until your right hip taps the floor.

Next, you have to lift your hips back to the center. Follow this up by rotating your hips to the left, lowering it until your left hip taps the floor. This is considered one single repetition. Continue repeating it 20 times.

Washer Crunches

Washer Crunches - 10-Minute Fat Loss Workout

The final part of the final stage of your 10-minute workout to lose weight is the washer crunches. To perform this, you have to lie face up on the floor, with your knees bent and legs flat on the ground. Your hands should be clasped behind your head. Elbows must be pointed out to the sides.

Gradually, lift your shoulders from the ground and squeeze the right obliques to curve torso to the right, while drawing your right elbow towards your right leg. Follow this up by squeezing your left obliques to curve torso to the left while drawing your left elbow towards your left feet. This is counted as one repetition. Do this for 20 times.

Repeat plank twist and washer crunches just as you have repeated the exercises of stage one and stage two.

So, for all you busy-bees who don’t have time to hit a nearby multi-gym but are struggling to fit into your favorite pair of jeans, we hope this 10-minute workout to lose weight will help you shed weight, save time and gain confidence. So, get your workout gear out and start beating some sweat and wear your jeans the next time you head out for a party. On second thought, if you still want an expert to guide you throughout these short-interval workouts, you can get in touch with Starmark as we are the best gym in Kolkata with the premium equipment and certified trainers.

10 Exercises to Avoid to Save Yourself from Injury

Here are the 10 exercises to avoid in order to stay healthy without any injury. Before hitting the gym, make sure you know about these dangerous workouts!

In the world of fitness, it goes without saying that as much as there is to gain from it; you can lose in equal portion, or even more if you don’t follow the rules or overestimate yourself by thinking you are a know-it-all. A lack of awareness often results in people performing routines and exercises that end up having disastrous results for them. There are some exercises that should not be performed by anyone, anytime and anywhere under any circumstances. So, what are we specifically talking about, you wonder? Well, look no further because here we are, presenting the ten exercises to avoid in order to save yourself from injury.

Exercises to Avoid to Prevent Injury

Some of the exercises that we have mentioned in this article may already be part of your workout regime and we do understand how difficult it is to drop or even in some situations add a new routine to your schedule because you think your body has adjusted well to it. Therefore, we are not only listing out the exercises you need to avoid, but we are also providing their closest alternates that are healthy and would function in a similar manner (minus the drawback) to the exercise that we are asking you to avoid.

1. Machine Leg Extensions

Machine Leg Extensions - Exercise to Avoid

Renowned personal trainer and strength coach Mike Donavanik has recently stated that there are no functional benefits to leg extensions. In addition, our knees are not designed to carry that much weight from that particular angle and doing so, makes us more susceptible to injuries. Just think about it in a practical manner; how often do you sit around and kick around your legs? Not often, right? So, why feel the necessity to perform this in the gym? Remember, any exercise that doesn’t use the natural movement of your body in ways that comply with real-world motions is problematic. Go for lifting exercises instead to get long-term benefits.

Alternates – Lunges, Deadlifts, Squats, Step-ups

2. Shoulder Press behind Head

Shoulder Press behind Head - Dangerous Exercise

It has been seen that shoulder presses that are performed behind the head have no benefits to them at all; instead, they make you more prone to injuries. This specific exercise is extremely dangerous and should be avoided as soon as possible since it puts your shoulder joints at high risk.  It locks down the joints at your collarbone, sternum and shoulder blades while inhabiting arm movements.

Alternates – Overhead Shoulder Press

3. Triceps Dips

Triceps Dips - Workout to Avoid

Award-winning fitness journalist Lou Schuler has stated that it’s a risk to lift your bodyweight when your upper arms are kept behind your torso. You may train your triceps through this, but you will inadvertently end up overloading the muscles that comprise the rotator cuff of your shoulder. Damage to these muscles will force you to withdraw yourself from performing simple everyday activities such as washing your hair.

Alternates – Triceps Push-Ups, Cable Pushdowns, Close-Grip Bench Presses

4. Squats with Exercise Ball

Squats with Exercise Ball - Workouts with Injury Risks

Next up on our list of exercises to avoid is squatting with an exercise ball. Contrary to popular belief, using an exercise ball doesn’t increase your knee stability and tracking while performing squats. More and more personal trainers these days are refusing to use it since they believe that holding the ball between the legs strengthens the adductors and increases the chance of your knees collapsing once the ball is removed.  You can go visit any multi-gym near you and speak to the professionals there if you don’t believe us. The argument that the ball prevents the knees from caving in is nothing but an illusion.

Alternates – Thera Band Squats

5. The Elliptical

The Elliptical - Exercises to Avoid

We understand the fascination of ellipticals –They are easy to perform and they have a rhythm to them which makes them fun to perform. However, as per certified fitness coach Christian Fox, people performing elliptical mostly results in people slacking because they generally move through a relatively small range of motion. Moreover, the recent economical designs have made the size of these machines much smaller, thereby lessening its effectiveness to a large extent. You basically need to hit a gym near you and perform exercises that would incorporate a lot of muscles into your movement.

Alternates – Rowing Machine

6. Upright Rows

Upright Rows - Workouts to Avoid

Experts claim that you will be susceptible to pain and inflammation in your shoulder joints while performing upright rows more than you can ever imagine. If you don’t want to dislocate or incur permanent shoulder damage in the future, then you have to put an end to this exercise as soon as possible.

Alternates – Dumbbell Front Raises

7. Lat Pulldowns behind Head

Lat Pulldowns behind Head

As we have stated before, forcing the body to perform a bodily movement that it is not designed to perform can have problematic results. This rule applies to our next exercise here – the lat pulldowns behind the head. This is also one of the exercises to avoid since it forces your shoulder to work at an angle that it is not designed for, resulting in tears and inflammation in the rotator cuff muscles of your shoulder.  What is worse is the fact that you don’t even realize the damage that it does to your body in the heat of the moment because you are in such an adrenaline rush when you perform this. Furthermore, there’s always the risk of getting an injury in your head while performing this; and the only way to avoid injury to your head is by extending your head forward, which puts more stress on your spine. So, it’s a loss from both ends.

Alternates– Kneeling Band Pulldowns

8. Seated Torso

Seated Torso - Workout with Injury Risks

Next, up on our list of exercises, you should avoid is the seated torse, which although seems harmless, leads to some serious adverse effects to your body. While using a seated torso rotation machine, you will notice that your pelvis doesn’t move as you rotate your upper body. Exercise Psychologist Jessica Matthews opines that this puts a huge twist force on your spine. Multi-gyms in Kolkata such as Starmark also shares the same thought as of Matthews. They think that this exercise, despite its claims, doesn’t fulfill the objective of reducing fat from a particular portion of the body.

Alternates – Wood Chops

9. 45-Degree Leg Press

45-Degree Leg Press - Exercises to Avoid

Leg presses are extremely dangerous since they put a lot of force on your hips and knees, which in turn, can result in injuries. The same is true for 45-degree leg press, which is widely popular among gym enthusiasts across the globe. Instead, try to perform an exercise that will give definition and strength to your legs while also engaging your core and improving your balance.

Alternates – Bulgarian Split Squats

10. Smith Machine Squats

Smith Machine Squats - Exercises You Should Not Do

Smith machine squats should be avoided because when you lower your body into a squat position using a smith machine, your back stands in a perpendicular position to the ground, almost perfectly straight, which has the potential to cause stress to your vertebrae. Besides, this exercise also requires you to lean back into the bar, which puts too much unnecessary pressure on your knees.

Alternates – Weighted Squats

Summary

There is a reason why it is always advised to get guided by a professional trainer, at least for a beginner. Not only do they know the nuances of workouts, but they also guide you into personalizing different types of exercises to suit your body and health. Therefore, speak to your trainers regarding your health and the kind of goals you aspire to achieve through workout. With the information provided by us and the help of a personal trainer, you would be in a better position to know which exercises to avoid and which one you need to stress upon. So, know more about health to live healthily!

3 BEST MORNING EXERCISES TO STAY FIT FOR THE REST OF THE DAY

Learn about the best morning exercises to stay refreshed the whole day. Now, don’t get tired for workload or any pressure. These workouts are there with you

Morning shows the day and if you start the journey of fitness in the morning, the whole day is going to be super fit. We are going to describe the best morning exercises which are simple and intuitive at the same time. After doing these workouts, you will be energetic and a better friend, partner, or colleague for all day long. Moreover, if you are feeling depressed, the morning workouts can help you come out of the depression. You need to be regular and honest with your workouts. Let’s explore some of the simplest and best morning workouts for you.

3 BEST MORNING EXERCISES TO STAY FIT ALL DAY LONG

Below are the easiest exercises to do in the morning. These will keep you energetic all day long. You can include them in your routine and practice at your home without even enrolling in a fitness center or gym.

1. CAT CAMEL STRETCH

Cat Camel Stretch is one of the best ways to stretch in the morning time. Stretching is the best way of muscle toning and preempting diseases like Arthritis. This kind of dynamic exercises also become useful during the daytime after a long period of inactivity.

HOW TO DO

  • Kneel Down on hands and legs.
  • Round your back like a camel so that your head tries to meet your pelvis.
  • Now, lower your back and lift your head so that your back creates an arch.
  • Repeat.

2. A WALK OR A RUN

This is one of the most common yet the best morning exercises you’d find. The best option will be walking or running outside of your home so that you can get in touch with nature but if you can’t, a treadmill will also be a viable option. You can set a time and increase the length of the time along with the time and your efficiency.

Try to set goals. And achieve those. Don’t try to walk or run a long distance on the first day. Make short goals and stretch them with time. It will help you get stronger bones and manage your weight as well. Moreover, your heart and blood pressure will also be maintained. Thus, the regular morning walk or run would always be a great choice as a morning workout.

3. LEG SQUATS

This particular morning workout not only includes the legs but your hips and knees will have a pivotal role to play in this exercise. It will help you with the knee stability and benefit your leg muscles such as hamstrings, calves, and quadriceps.

HOW TO DO

  • Stand in a pose with your feet a little further out from your hips.
  • Keep your arms out in front of you.
  • Try to sit in that position till you reach 90° angle. You can lower yourself as well if you can.
  • Return to the starting position.
  • Beginners should repeat this 15 times for 2 sets.

WRAPPING UP

Morning exercise is extremely important as the beginning of your day would define the rest of the day. Make sure you are availing the above morning exercises and some more to keep yourself fit. If you want an expert help, contact Star Mark Fitness Studio for each kind of exercises and workouts.